“Far off in the red mangroves an alligator has heaved himself onto a hummock of grass and lies there, studying his poems.”
Mary Oliver
One of the most profound things that you observe as you travel across our great nation is just how different the landscape changes. The US holds an astonishing number of different ecosystems and habitats. You can wake up one morning gazing out at waves crashing along the shore, only to find yourself another morning shaded by towering mountain peaks. You may find yourself surrounded by cacti and red dirt or taking in the fiery reds, oranges, and yellows in an autumn deciduous forest.
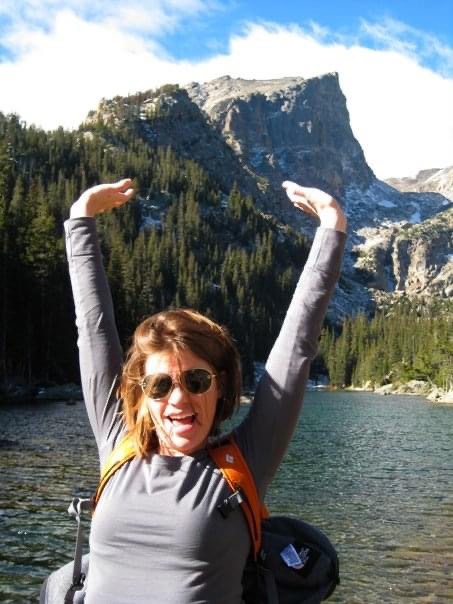
I always knew that the US held amazing sights. I discovered this fact outside of the pages of a book in my early 20s. The first time I visited the Rocky Mountains took my breath away and the term “mountain” earned new respect for me.
My first time in the Rocky Mountains, pre-Dan. I was enraptured with the expanse of them!
What I didn’t do in my 20s… heck, what I didn’t do necessarily in my early 30s… was to not just catch the glimpse. The moments in which I was rewarded with varying landscapes across the US were quick and seemingly unintentional.
Dan and I found an early love for our national parks. We jokingly (I think it was before it became a social media “thing”) said that we should visit them all before we died. It would become our bucket list that we did together.
We’ve already achieved a lot. Together, we’ve visited 29 national parks. And it’s been amazing.
But, I realize now, those mini vacations we took where we stopped in and toured national parks, on many occasions for only a day, were just a glimpse into these majestic lands. This adventure we’re on, where we travel the country and camp on a full time basis, gives us the opportunity to do so much more. And for that, I’m thankful.
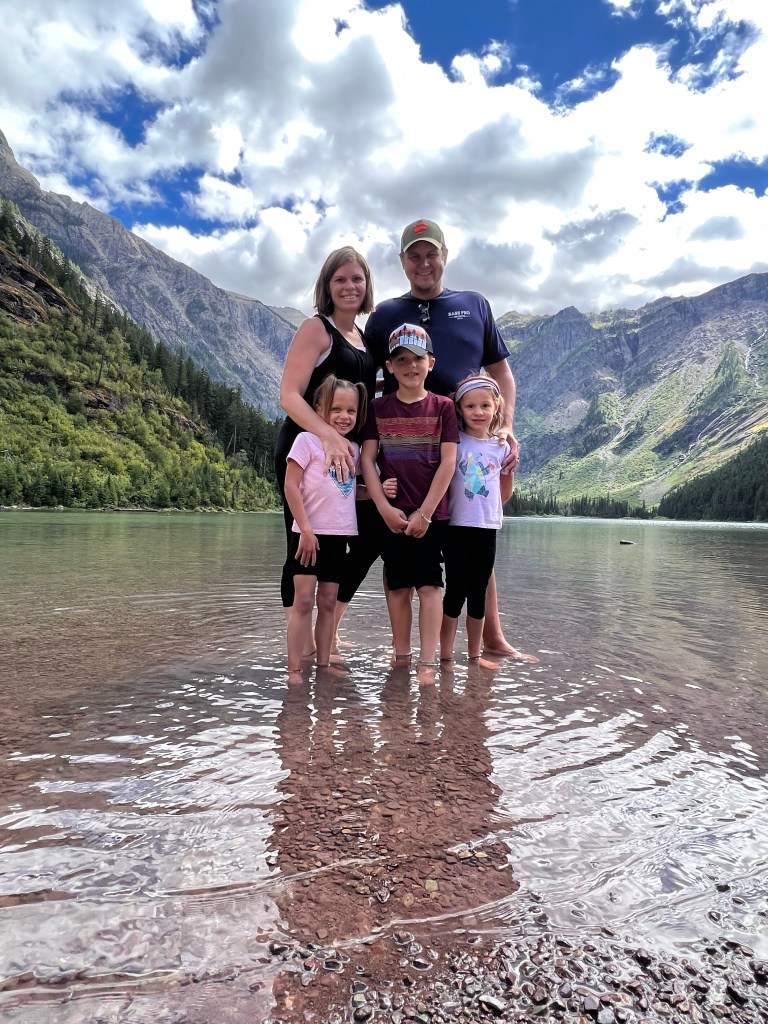
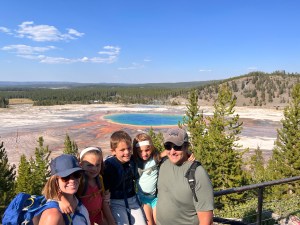
Biscayne National Park
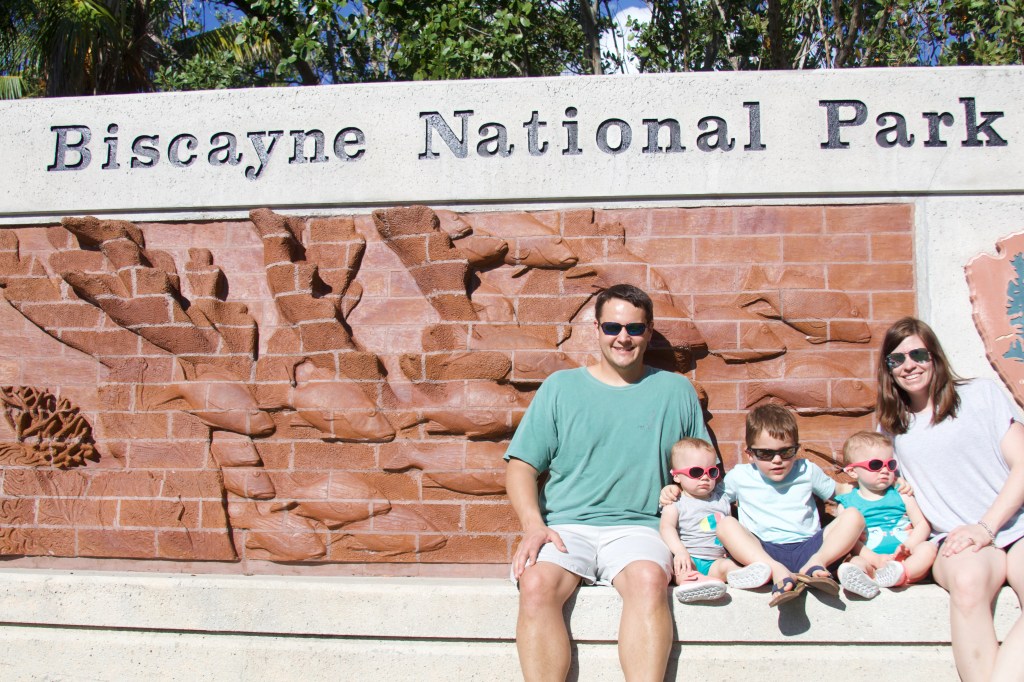
We first visited Biscayne National Park in 2018 when our kids were only 4 and 1.5 years old. We flew down to Florida for my cousin’s wedding and stopped in both Biscayne and the Everglades. Our first visit to the park was a quick stop and literally a stamp in our passport book. We knew that the park held more than what we saw, but without a boat or making reservations for a tour, there wasn’t much more that we could do.
Our first Biscayne Visit in 2018.
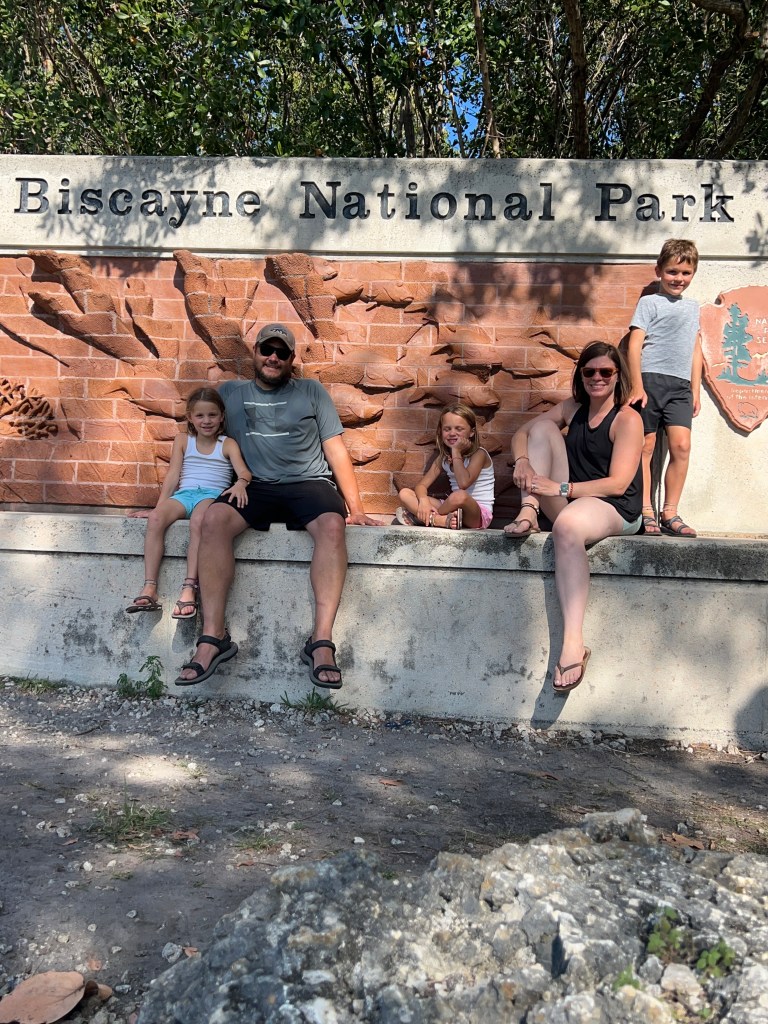
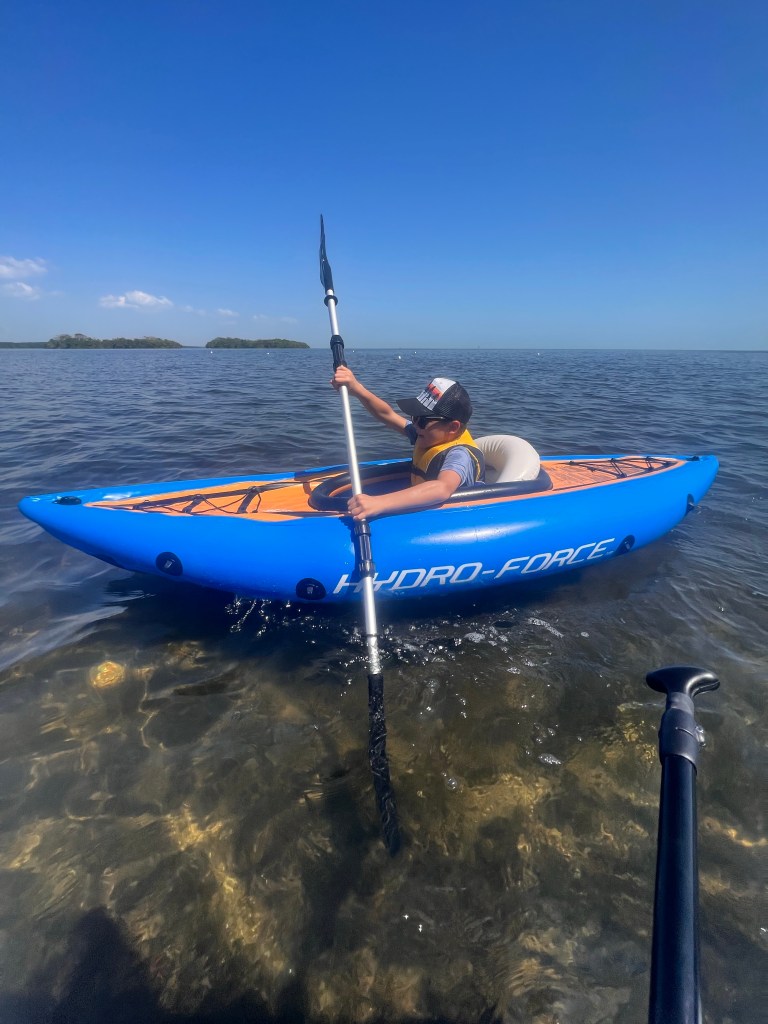
Being down in southern Florida, we knew we wanted to stop at Biscayne so our kids could earn their Junior Ranger badge and we could explore the park a little bit more. We prepared ahead this time, however, and brought our inflatables so we could get out into the bay.
Biscayne National Park is located just off the southeastern coast of Miami. Biscayne was established as a national park in 1980, and it protects mangrove forests, coral reefs, many Florida Keys, and the waters of Biscayne Bay.
The mangrove forests that line the bay play a vital role in sustaining the marine ecosystems by providing a nursery for 70% of the fish species that live there. Birds flock to the tops of trees, and you can spot spoonbills, ibises, herons, and pelicans along the shores.
Bordering Biscayne Bay are various Florida Keys, which provide an additional home to more marine wildlife. Here you can snorkel in lagoons and along coral reefs to see many other types of fish and marine animals.
Exploring Biscayne National Park with Kids – Kayak, Paddleboard, or Canoe
Being that the majority of this national park is a marine ecosystem, the absolute best way to explore the park is on the water. We were able to bring our inflatables with us to explore the park. But no worries if you do not have watercraft that you are traveling with, tours are available to book through the Biscayne National Park Institute. You can find tour prices and descriptions listed here.
The kids in the same spot, but just a little older.
The first thing you will want to do is visit the Biscayne Visitor Center. The visitor center is located in Homestead, Florida. Here, you can find some exhibits on the ecosystems surrounding the bay, as well as talk to a ranger. We were able to look at maps the ranger showed us and see suggested kayak paddling routes.
After visiting the visitor’s center, you can launch your paddleboards and kayaks at the marked launch in the same parking area. From here, you are free to explore!
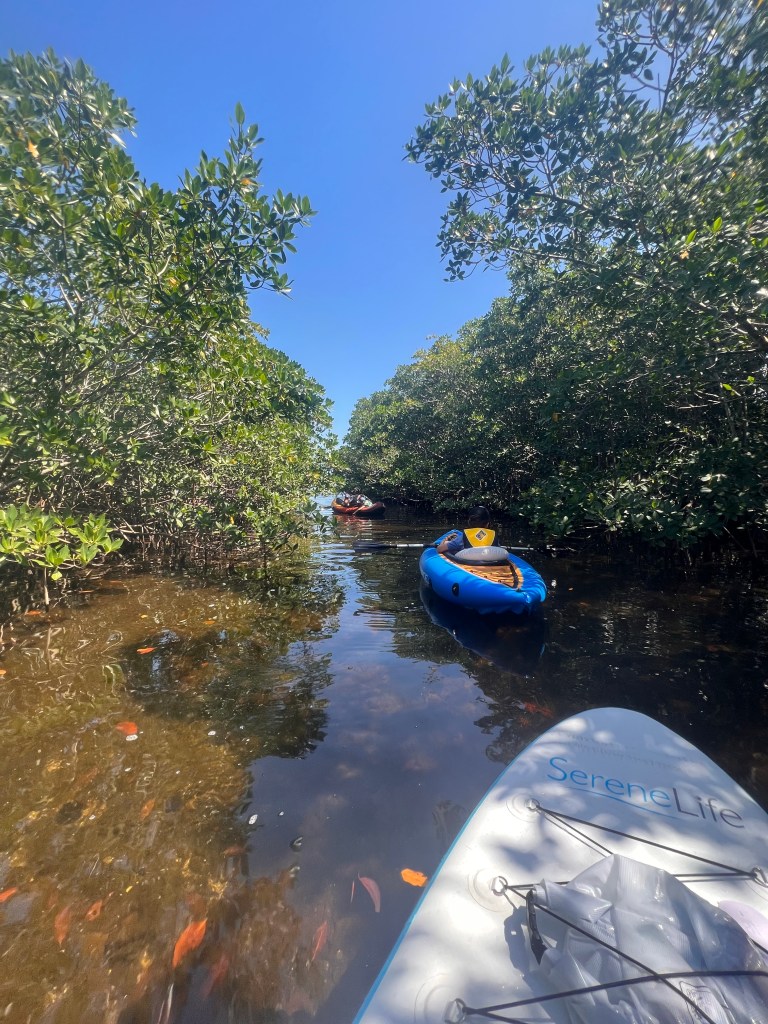
Immediately, you can skirt the shorelines and study the mangroves. Mangrove trees are simply magnificient to look at closely, and it is a marvel how their roots grow in such an interesting way. There are a few sloughs where you can paddle into the mangroves. We honestly had no worries about getting lost. The sloughs were incredibly slow moving and the ranger had told us that no matter how far in we got, they always connect back together and lead to either a canal or the bay.
Levi’s first time in his inflatable kayak.The girls doubled down with Daddy.Paddling into the mangroves.
It was in these mangrove sloughs that we found a huge variety of fish. Schools of mullet darted around our paddles and jumped out of the water in front of us. We saw ibises take off from their roosts in the trees and observed jellyfish floating in the waters beside us.
When you aren’t paddling in the mangroves, paddle around the sea grass flats in Biscayne Bay. Here you can find an abundance of different wildlife. Our favorite that we saw were two barracuda. The waters here are shallow and clear, allowing you to see all the way to the bottom of the bay.
Paddling in the sea grass flats.
The best thing about exploring the park via the water is that you can decide how long you want to stay out. We were out on the water for about two hours before we trekked back across the bay and to the visitor center. Once we arrived at the visitor center, we allowed the kids to jump out in the shallow water and get themselves wet!
One nice part the paddle experience at Biscayne is the accessibility of the water access. The launch area is large and easy to load and unload your watercraft. There is also a freshwater hose near the kayak launch so that you can rinse off your gear from the saltwater. Take a picnic lunch to eat by the water when you are finished!
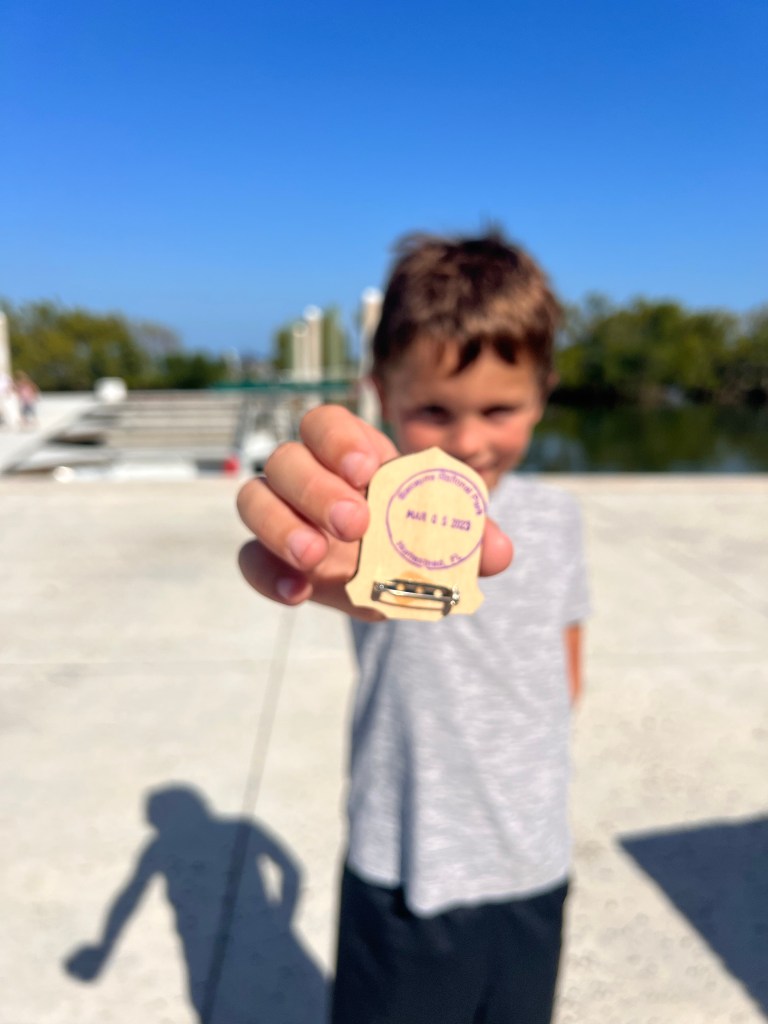
Junior Ranger Badge
Like the other national parks in our national park system, your children can also earn a junior ranger badge while here. The cool thing, however, is that Biscayne Bay has partnered their junior ranger program with nearby Everglades National Park and Big Cypress National Preserve.
Working on the Junior Ranger badge after lunch.
While you can earn an individual badge at Biscayne, the junior ranger book is actually combined for all three. To earn a badge at Biscayne, complete three of the “dolphin” activities in the book. Once those are complete, show your work to a ranger and earn your badge.
The best part? Once you earn badges at all three national parks, you can earn a patch for all three parks. We picked up our booklet at Biscayne and earned the badge there. Then we took our book home and the kids completed the remainder of the activities while at home. When we visited Everglades and Big Cypress the following weekend, we were able to earn our patch!
Another Junior Ranger badge in the books!
More of Biscayne National Park
Quite possibly, the best way to get our and see Biscayne National Park is by getting on the water. If you are an experienced kayaker, or if you are able to book a tour, I have heard from the rangers that accessing the keys bordering Biscayne Bay are simply magical. There are lagoons to go snorkeling and other opportunities to view wildlife on these small islands.
We were unable to access these further islands, but maybe one day we will find ourselves back here. What I am most grateful for after this recent trip was the ability to see the national park from the water. Being able to take the kids out on the water and immerse them in the wildlife and plantlife growing on the shores of southern Florida was amazing.
If you ever find yourself visiting southern Florida, we highly recommend a stop at Biscayne National Park!
“The world reveals itself to those who travel on foot.”
-Werner Herzog
Glacier National Park is nicknamed the “Crown of the Continent” and for good reason. The striking mountain peaks rival those of Europe. Even though they aren’t incredibly high, their formation leaves bowls at the tops of the mountains, giving way for lingering snow packs and glacial deposits. The park boasts over two dozen named glaciers, and while warming climate is reducing the numbers and sizes of these glaciers, the ability to see some of them up close is still worth booking the trip.
One of the jewels in the crown of Glacier is the nearly 50 mile Going-to-the-Sun Road which connects the towns of West Glacier and St Mary. The road is an engineering marvel, completed in the early 1930s and riding along the Continental Divide. It’s highest point is at Logan Pass, sitting at over 6,600 feet of elevation. Going-to-the-Sun Road gives visitors sweeping views of the valleys below, with waterfalls and high elevation snow packs visible around every turn.
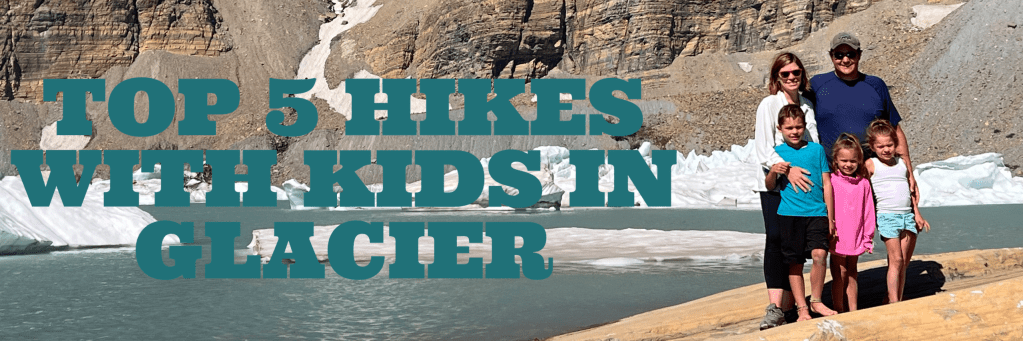
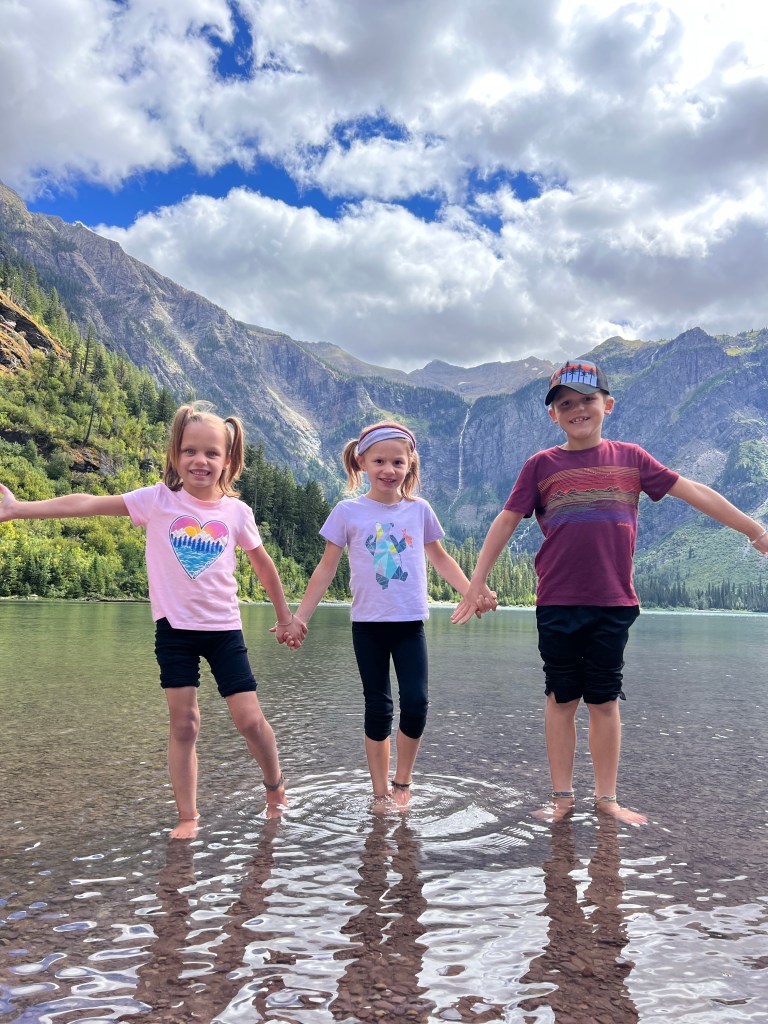
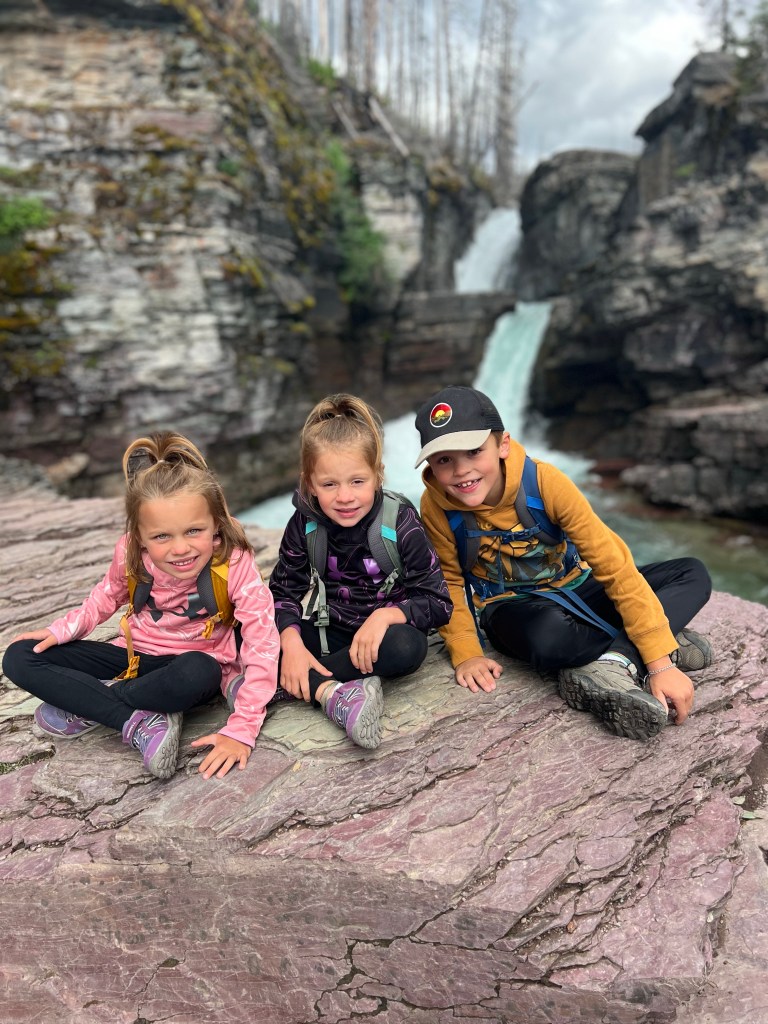
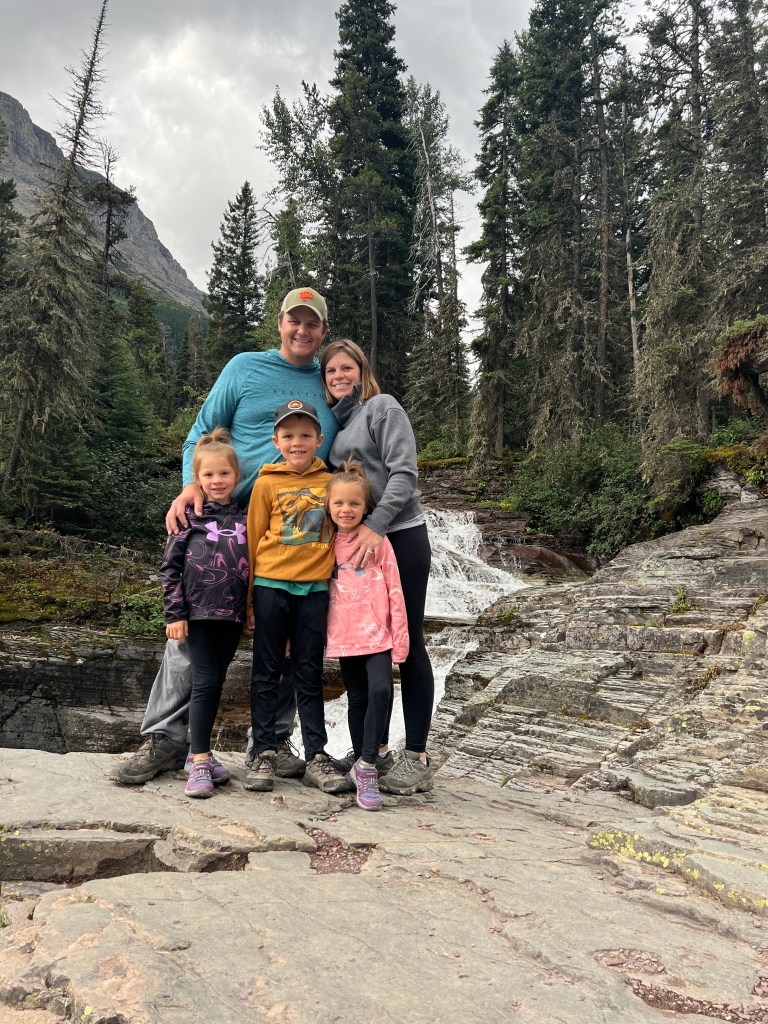
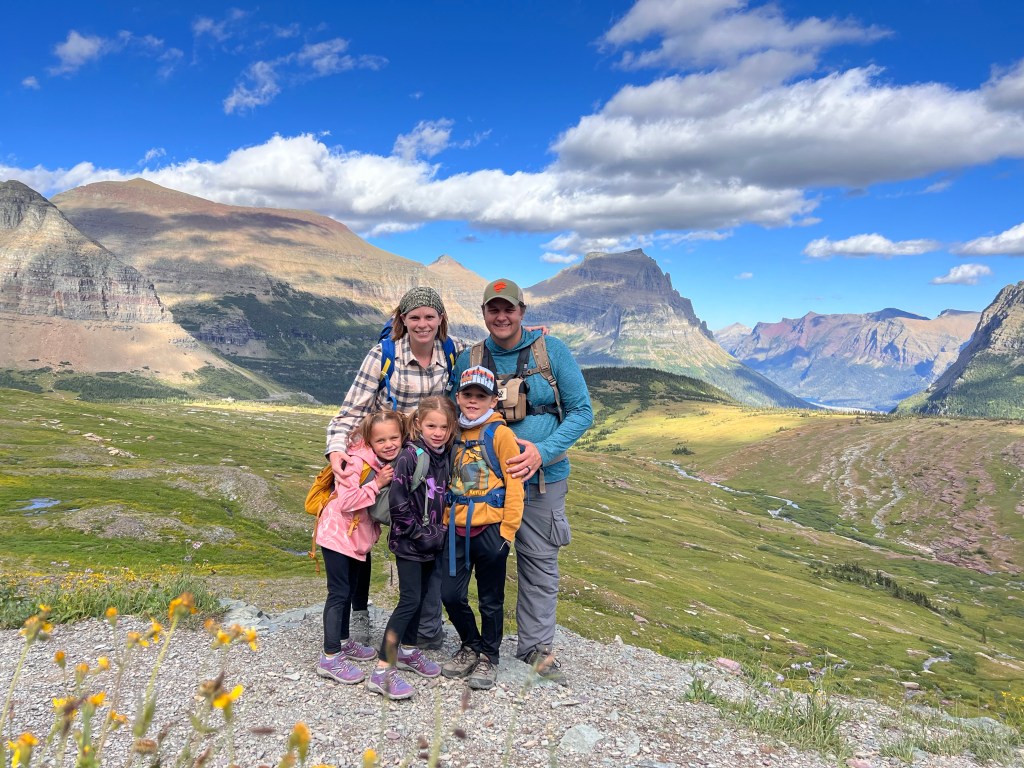
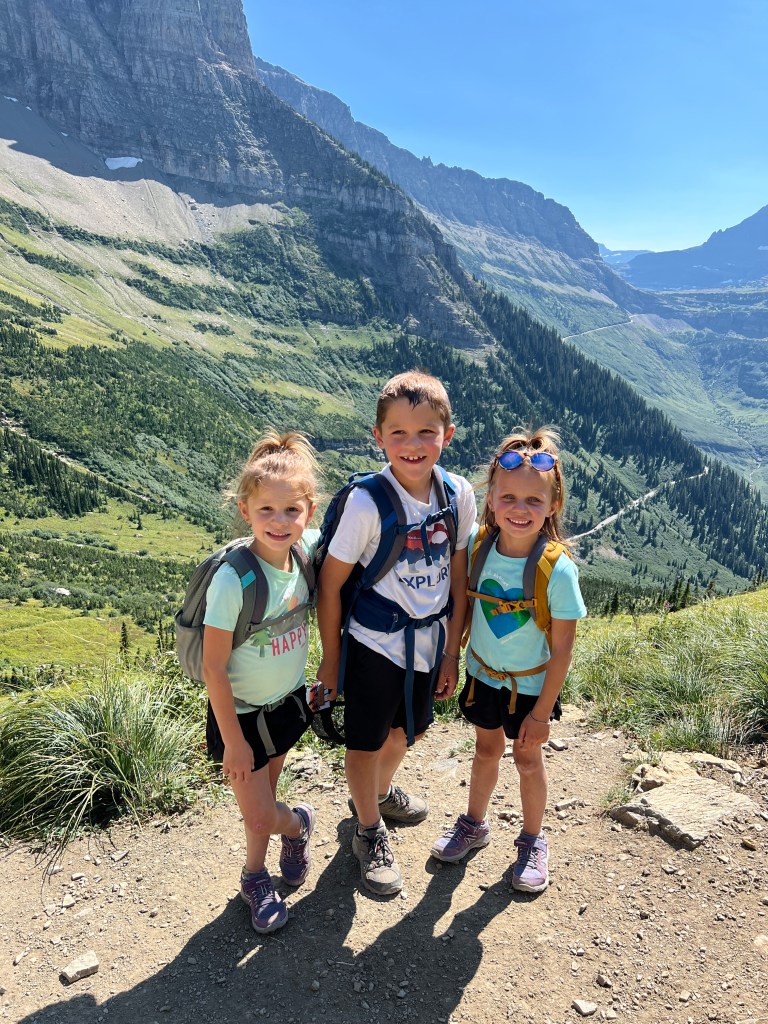
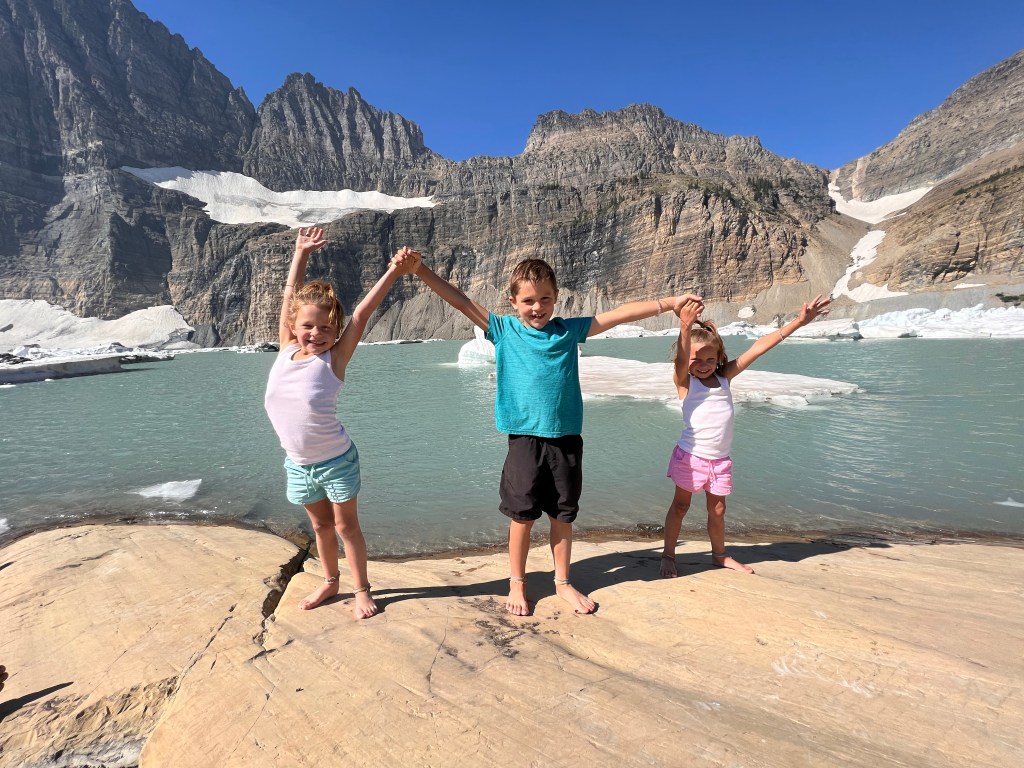
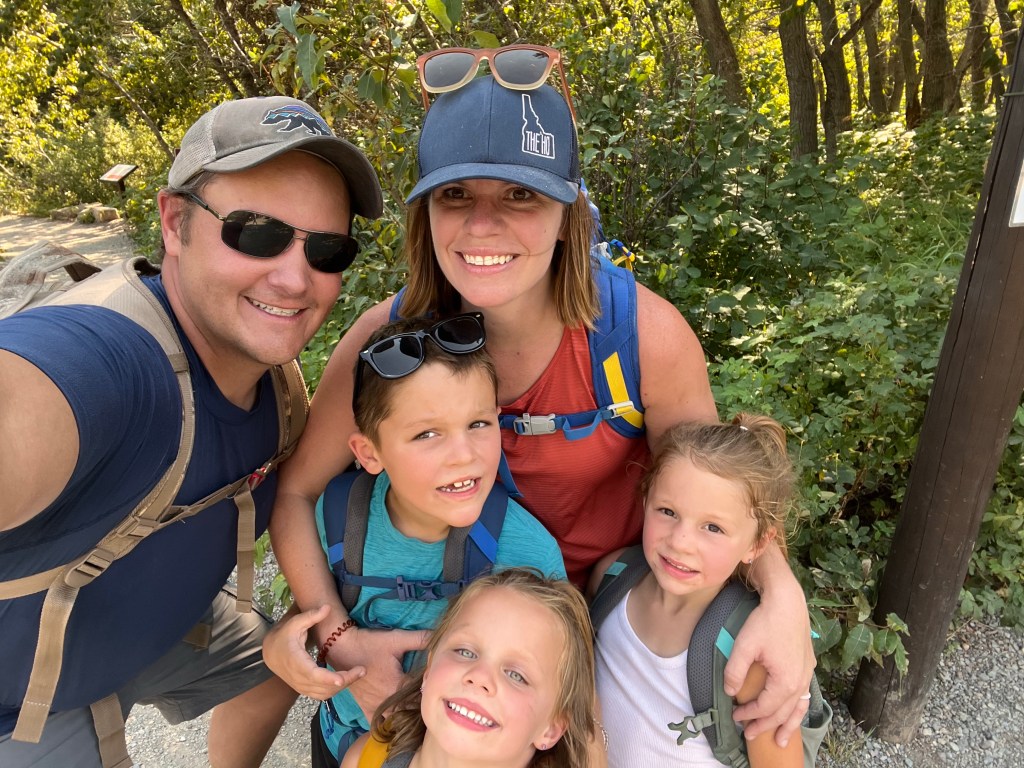
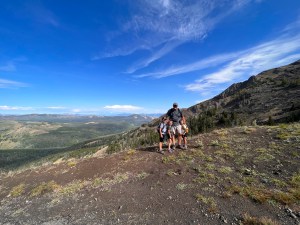
While Going-to-the-Sun Road is a definite must-do when visiting Glacier, I truly believe that the best way to see the park is to get out and hike. There are so many points of interest in the park, and I don’t think there is one “bad hike.” Since Dan was able to take off for a week while we explored Glacier, we were blessed to be able to hike quite a few trails in the park. It was honestly hard for us to come up with our top five! While some of these hikes were a little more difficult than others, we still were able to complete each of them with our kids. At the time of this trip, our kids were 8, 5, and 5.
Before listing our top hikes, I want to emphasize some important tips. Please consider these tips as you hike into Glacier’s backcountry, even if it’s a shorter hike.
Carry Bear Spray: Glacier is prime bear country. We were blessed to be able to safely view bears from our vehicle on eight different occasions throughout the week. We spotted seven black bears and one grizzly bear. With Glacier having such a short season with snowy winters, bears and humans are occupying the mountainsides at the same time of year. When hiking with the kids, Dan and I both carry bear spray on our hip. Don’t keep it in your backpack – you want it easily accessible. We keep the kids between us, with one of us in the front and one of us in the back. Bear spray can be purchased in the park or even at WalMarts and Costcos (cheapest!) if you are close to a town with one of those stores. If you are flying in, either buy it at one of these stores or you can rent it through Glacier Outfitters. Rentals can be reserved online and picked up in either Apgar Village or even the Glacier Airport.
Stay on the Trail: Glacier has delicate ecosystems, especially at elevation. If you are hiking in the alpine zones, the vegetation is especially fragile due to the short growing season. We saw a group disregard the signs on one trail asking you to stay on the designated path. For the first time, karma was on our side and there was a ranger coming around the bend just as they starting hiking onto some lingering snowpack.
Pack it Out: The saying you often hear is “a fed bear is a dead bear.” Once a bear gets a taste of human food, they’ll come looking for it. Make sure you pack out all of your trash.
Expect Crowds: Of all the national parks we have visited, I have never encountered crowds quite as bad as Glacier. This is especially true at trailheads. Make sure you are flexible with your plans for the day. If there is no parking at a trailhead, consider riding the shuttle for free. Don’t expect to be taking in any natural wonders on your own…. be prepared for lots of people… even on the long hikes!
Pack for ALL the Weather: Packing layers is essential in Glacier. You might do a hike down near one of the lakes that is warm with a slight breeze and then later in the day it’ll be cold and windy. We experienced so many different temperatures, wind, sun, snow, smoke, rain; all in the week we were there. You should also pack sunscreen, as many of the hikes at elevation are exposed with full sun.
I have lots of other tips and tricks for hiking with kids. From wearing appropriate footwear, to bringing all the snacks, and giving them ownership of the hike… there are things that we’ve found that have worked to encourage our kids to go the extra mile, literally. Kids are capable of extraordinary things and as I tell mine all the time, “you can do anything you put your mind to.” Our kids have impressed the heck out of me with their mileage and elevation gains… this past trip doing some of their longest distances. It means the world to be able to experience some of these new places with the kids. Their wonder and their sense of accomplishment makes every hike worth it.
Trailhead Location: Going-to-the-Sun Road near Lake McDonald Lodge
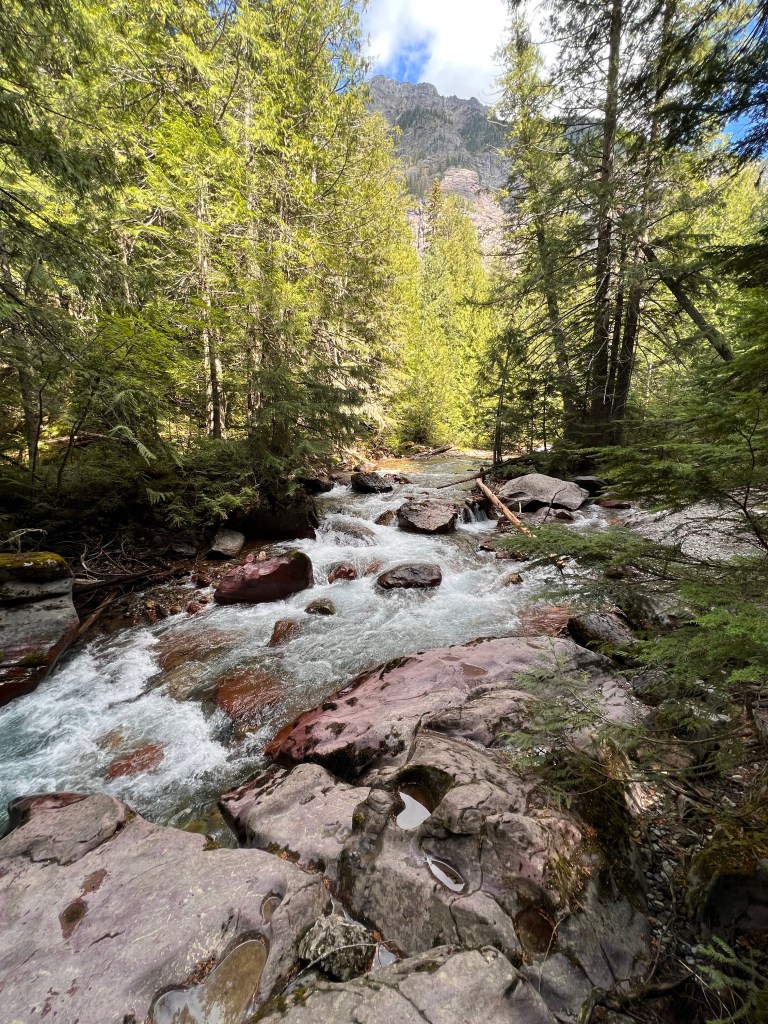
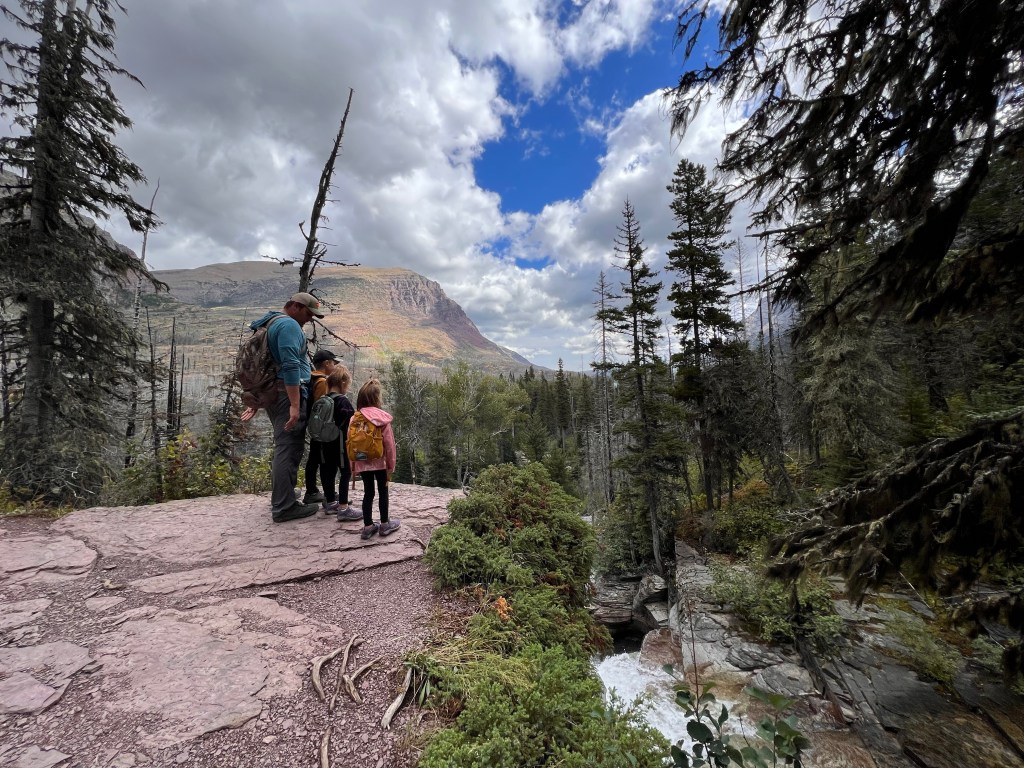
Avalanche Lake is a highly trafficked trail and parking can sometimes be difficult. The trailhead sits right along the Trail of the Cedars, which is another great add-on hike of less than a mile. The Trail of the Cedars winds along a boardwalk through an old growth cedar forest. It is a great option for younger children who want to walk, or also as an add-on to the Avalanche Lake hike, which is what we did when we went on this trail.
One of the first natural wonders you’ll encounter on the Avalanche Lake Trail is a narrow gorge of red rock, carved out by Avalanche Creek. It is a happy surprise on the trail and there are several spots where you can look over the gorge. After encountering the cascading waterfalls, you will veer away from the creek and complete the remainder of the hike through a pine forest. You’ll gain some elevation, but the path is well-cleared. You will come to the first views of the lake after about 2.5 miles. There are some benches to eat some snacks, and plenty of shoreline to take in the views of the lake (most likely with quite a few of your newest hiking friends). The trail does continue around a portion of the lake, but it does not encircle the lake. Completely up to you if you want to continue on the hike for another quarter mile.
There is a pit toilet located just before you reach the lake. To get back to the trailhead, turn around and go back on the same trail.
Kids in an old tree along the Trail of the Cedars.Our family at Avalanche Lake. Pictures do the water color no justice.Water was incredibly shallow near the shoreline.Avalanche Creek gorge.Avalanche Creek.
Trailhead Location: Going-to-the-Sun Road near St Mary Lake in East Glacier
I have to be honest, this trail holds a very special place in our lives. For those that don’t know, in 2011 Dan took me on a surprise trip to Glacier. It was on this hike to Virginia Falls that Dan got down on one knee and asked me to marry him. And the rest, they say, is history.
Because of our special moment, we knew we wanted to take the kids back to this hike in particular. Some things have changed since our last visit eleven years ago! First, this hike is another popular hike in the park, meaning if you see a parking spot, grab it. If you are unable to gnab a parking spot, the shuttle does make a stop at the trailhead, which is accessed right off the road. Secondly, the area was engulfed in a wildfire back in 2015. As a result, the first mile and a half of the trail is walking through some burned out trees. The upside, however, is that you get beautiful views of St Mary Lake as you hike.
When we hiked this trail, it was incredibly windy. As I noted above, pack layers for in the park. The wind was whipping down through the valley and was gusting quite heavily. We still had a beautiful hike though. The first waterfall you will encounter is St Mary Falls, a triple tiered waterfall that drops 35 feet. What is most spectacular about St Mary Falls is the color of the water. Being glacial fed, the minerals from the glaciers and rocks are deposited into the water, giving it the most magnificient teal color.
After viewing St Mary Falls, continue on to Virginia Falls. You will first veer closer to Virginia Creek, and some cascading waterfalls as the creek loses elevation. If you are interested, it was near these cascading falls that Dan dropped to one knee. You will continue to climb a little bit of elevation, before viewing the second waterfall of the hike, Virginia Falls. In all honesty, being able to view Virginia Falls up close takes my breath away. You will be able to stand right at the base of the falls, and see the water cascading down the main fall of nearly fifty feet. The kids loved feeling the spray on their faces and we spent some time at the falls. There is a pit toilet located just a little way down from the base of the falls. To get back to the car, turn around and take the same trail back to the trailhead.
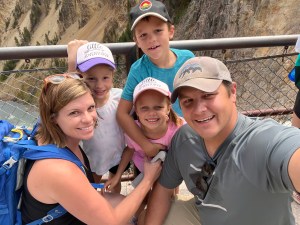
Views of St Mary Lake at the beginning of the hike due to an older forest fire.Kids at St Mary Falls.The upper portion of St Mary Falls.Revisiting the spot where Dan popped the question.Kids at Virginia Falls.Spying a moose on the hike back to the car.
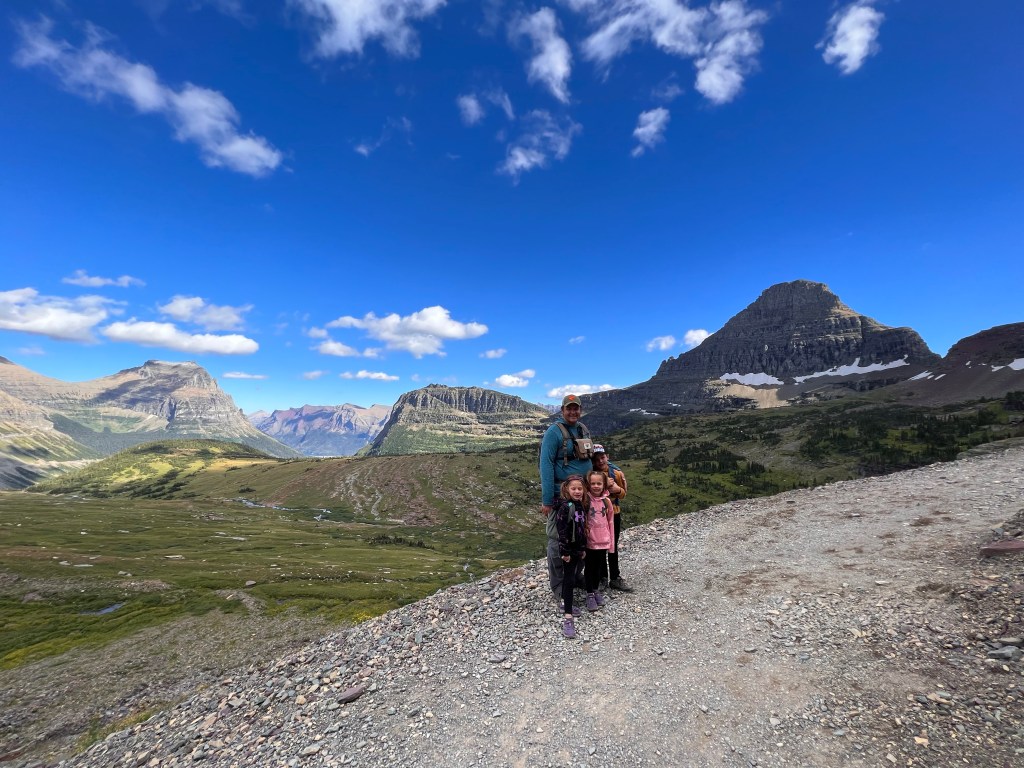
Trailhead Location: Going-to-the-Sun Road, behind the Logan Pass Visitor Center
First of all, good luck getting a parking spot at Logan Pass. Nearly every time that we drove past the parking lot, it was overflowing and full. We did get lucky twice! Once when it was overcast, windy, and freezing cold… and late in the afternoon. The other time it was also overcast, freezing, and late in the afternoon. Logan Pass is the highest point on the Going-to-the-Sun Road and it gives you sweeping alpine views. We nabbed a spot late one afternoon and decided to hike this trail right away (even though we had already hiked six miles earlier in the day). If you are unable to find a parking spot (or don’t even want to try), Glacier does have a shuttle system where you can park lower down the mountain and ride the shuttle up to Logan Pass.
This is also a good time to mention that you should always travel with layers while in the park, especially if you plan on hiking. The hike we completed earlier in the day was warmer and the kids were walking barefoot in the water. Later on in the day, when we were able to hike Hidden Lake, the temperature had dropped significantly and the wind had picked up. It was so cold and windy, the kids were using buffs from their backpacks to wrap around their faces to keep them warm.
I also want to mention that Logan Pass has a very short open season. In 2022, it had one of the latest openings (mid-July) due to late season snowfall. And that was just the road opening. Trails will most likely be closed even longer. This happened to us when we visited in 2011, we weren’t able to hike Hidden Lake because it was still snowcovered. Usually, snowfall arrives by mid-to-late September, and the pass will close again.
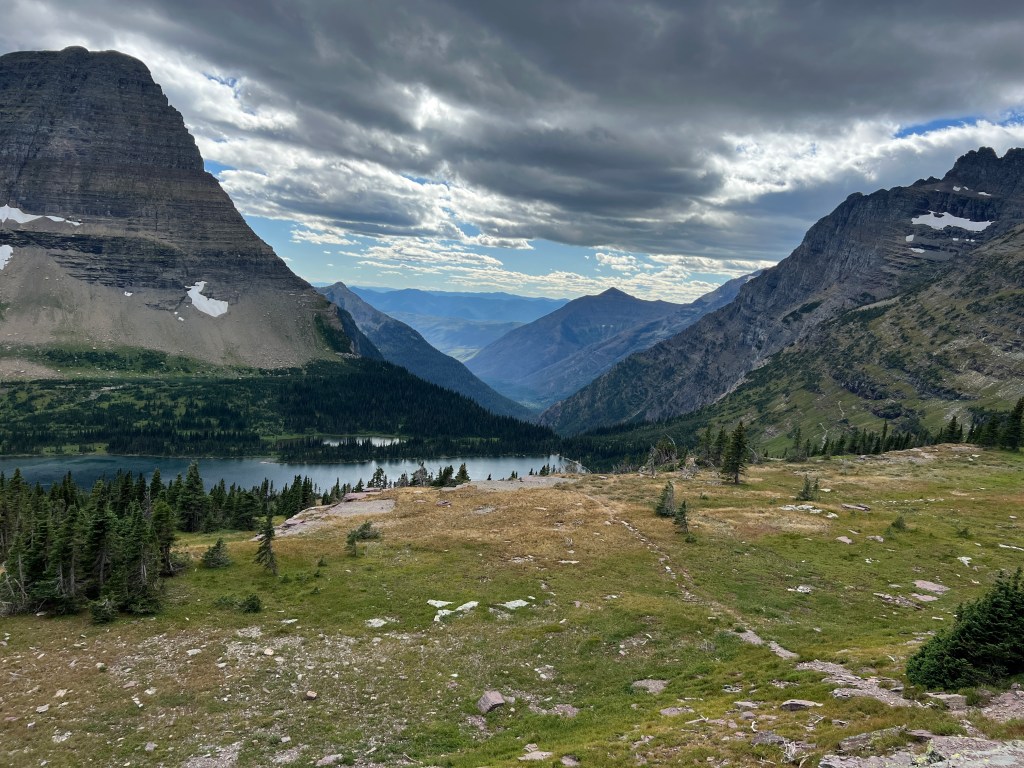
All of these warnings aside… tough to find parking, fitful weather, and short seasons… Hidden Lake is one of the best short day hikes we have ever been on. Sweeping mountain views, alpine meadows, high elevation lakes, and lots of wildlife sightings… this hike has it all, in just 3 short miles!
The trailhead can be picked up directly behind the visitor center. It is an easy trail for walking, the majority being on a boardwalk and then over packed dirt paths. You’ll encounter alpine waterfalls almost immediately… and quite a bit of elevation. Remember, hiking at elevation, the air is thinner and it can be harder to breathe. Hike slowly and marvel at your surroundings!
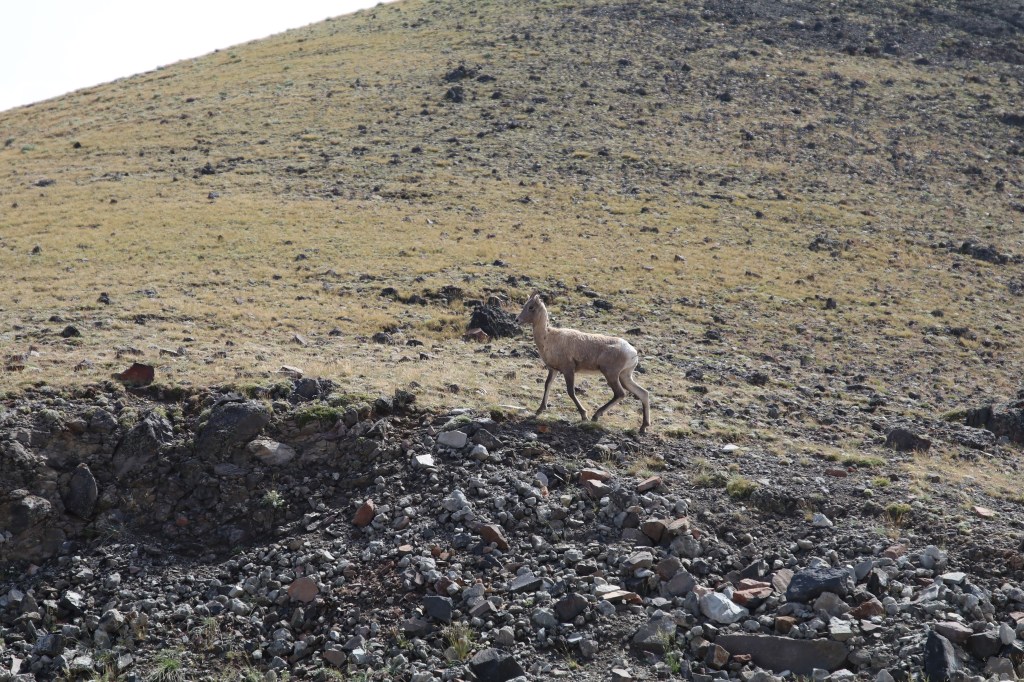
This trail is an excellent place to view lots of Glacier’s wildlife. We saw ground squirrels, marmots, bighorn sheep, and mountain goats on the hike. Grizzlies are also known to be spotted in the area. As a matter of fact, you can typically continue this hike all the way down to the lake, but at the time we visited, the trail was closed beyond the overlook due to a mama grizzly and her cubs frequenting the lake area. We scanned for them with our binoculars, but weren’t able to spot them.
To return to your car, you take the same trail back to the parking lot. I also want to note that you should not leave the trail during this hike. It is against the rules to disturb the natural environment while in the alpine meadows. They have a short growing season, and you will get in trouble if you are caught straying off the trail!
The hike out to the Hidden Lake overlook.Sweeping alpine views all around!Hiking to Hidden Lake. It was cold and windy!Hidden Lake in the distance.Our family with the glacial peaks in the background.
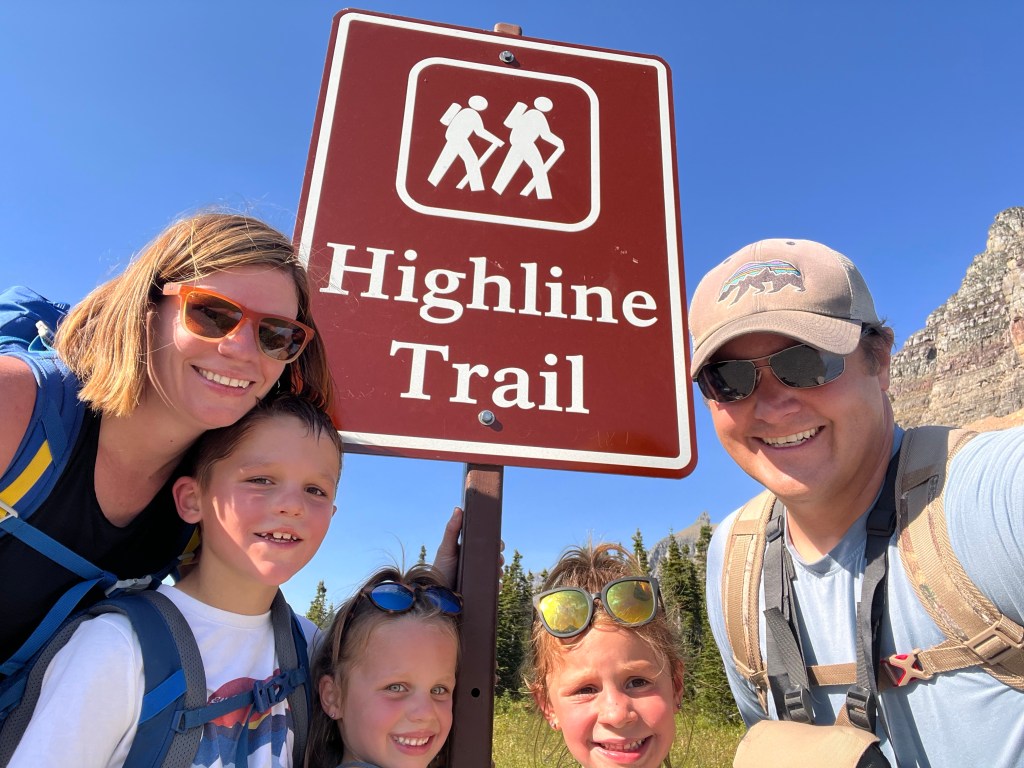
#2: Highline Trail (to Haystack Butte)
Mileage: 8.2 miles out and back (but you can longer if you want to do a point to point hike of Highline)
Trailhead Location: Going-to-the-Sun Road, across the road from the Logan Pass Visitor Center
I am going to start off with a slice of reality – hiking any portion of Highline Trail is generally the one hike that many people come to the park to do. Highline is unlike so many hikes, and it gives hikers a sense of daring adventure, with unparalleled views of the park. Because of its popularity, the parking lot at Logan Pass, where you can access the trailhead, is typically full by 7:30 in the morning. Parking lots will continue to fill up down the mountain as time passes. Your best bet to access the trail is to take the Glacier shuttle; parking further down Going-to-the-Sun Road and riding the shuttle up to the parking lot. The other option, of course, is to wake up before sunrise and get in the park!
When we decided to do a portion of the Highline Trail, we made two mistakes. First off, we did not have an endpoint in mind. We weren’t sure how far the kids could hike (their longest hike up to that point was Mt Washburn in Yellowstone at 6 miles). The second mistake is that we attemped to get a spot at Logan Pass instead of just riding the shuttle. Driving all the way up to Logan Pass, then having to turn around and find a shuttle spot, and then wait a half hour for a shuttle took over an hour’s time, meaning our hike started later than we wanted.
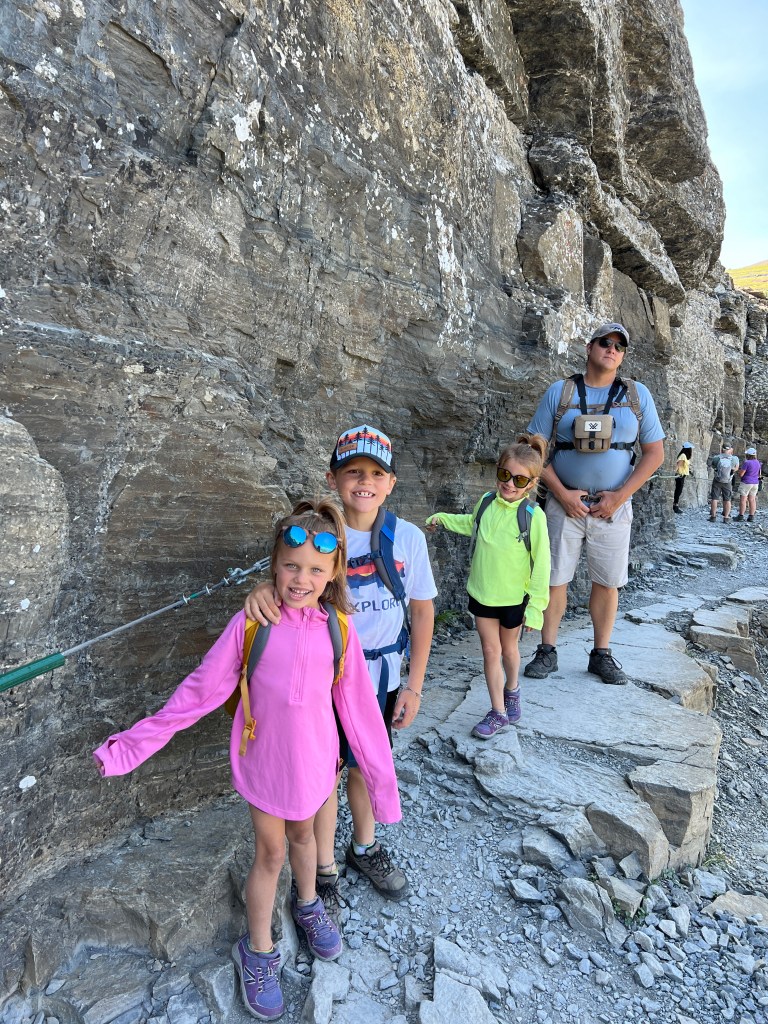
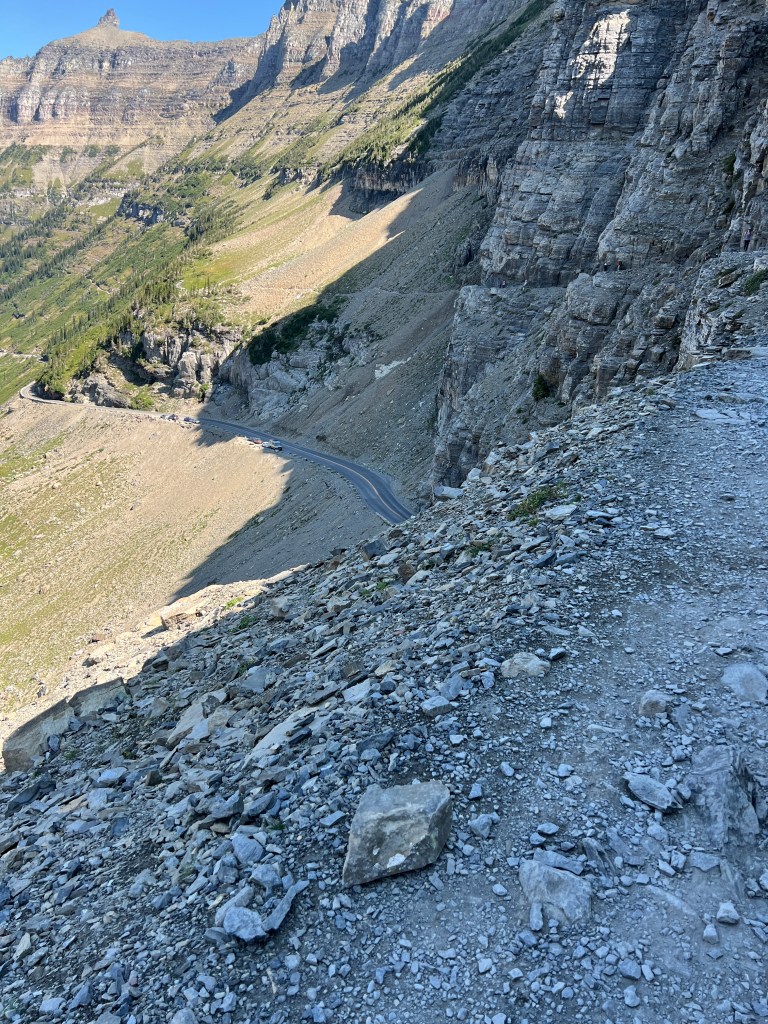
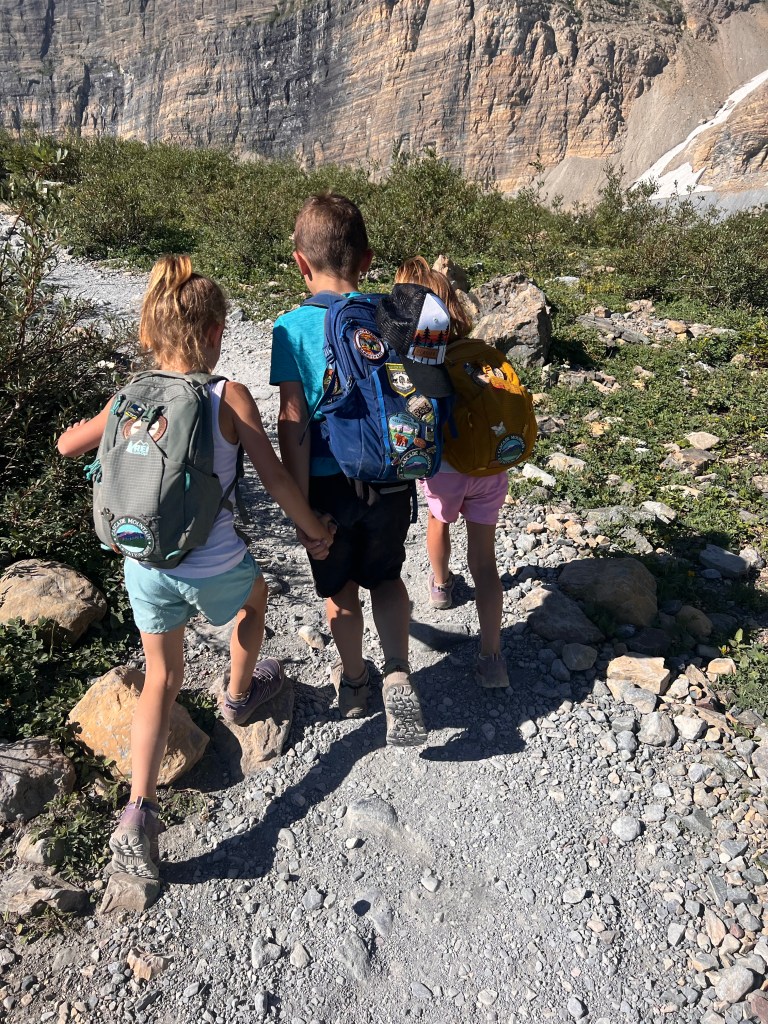
We finally got to the trailhead at Logan Pass around noon. The beginning of the trail is the most highly sought after part of the hike, and the portion that the majority of people who hike Highline Trail complete. The first half mile of the trail snakes its way along a fairly narrow cliff edge, directly above Going-to-the-Sun Road. There are sheer drops and sweeping views of the valley below. Cars pass by below, as you wind along the ridgeline of the Continental Divide. For this first portion of the hike, there are cables drilled into the rock face for you to hold on to. After reading about this portion of the hike, we honestly debated on whether to hike it with three young kids. In the end, I am so glad we did. We talked to the kids before starting out and talked about the importance of holding on to the cable line and watching your step. While the trail was narrow, there was still room for people to pass you on the trail without a big risk of being too close to the edge. I will also state that the other hikers were very considerate of our children, and people coming the opposite direction all moved off the cable to let our children pass, so our kids never took their hands off the handholds.
After getting past this part of the hike, the amount of people on the trail honestly filters out. I think a lot of people turn around after hiking a short portion of the trail and hike back to their car. This is something that you could do if you aren’t interested in continuing on the trail. For roughly the first 3.5 miles or so, the trail follows the same ridgeline as Going-to-the-Sun Road and you can see the cars winding up the mountainside far below you. There were some portions of the hike that are very narrow and have steep cliffsides (this time with no cable handhold). To tackle this, we each had the girls secure their hiking backpacks around their waists and chests tightly, and kept our hands clasped around their backpack straps. I would be lying, however, if I didn’t say it made me wary, especially with Levi walking on his own. My own fear of heights kicked in a few times.
After veering away from Going-to-the-Sun Road, you climb a few switchbacks up to Haystack Butte. Here, you get views of a new valley, and ground squirrels scamper about. We ate a lunch up here. I should note, this entire hike is exposed in the sun… there is not much shade. Keep this in mind as you hike. When finished lunch, we turned around and hiked the 4.1 miles back to Logan Pass. On the way back we saw two large bighorn sheep rams and a mule deer doe.
I stated at the beginning of this section that if we had made two mistakes on the day we hiked Highline. We had no idea at the beginning of the day that the kids would be able to muscle through 8.2 miles with quite a bit of elevation gain. If we had known they could’ve done the mileage, we would’ve caught an earlier shuttle and hiked the entire Highline Trail down to the Loop further down on Going-to-the-Sun Road. The length is roughly 11 miles, but after a certain point, the majority is downhill and there is no elevation gain. Along the way, you have the option to add on a Grinnell Glacier Overlook, and you can also access the Granite Peak Chalet along the trail (only accessible by hiking). This chalet is a place where you can get some snacks and water, and also apparently is a great place to view wildlife. This portion of the hike Dan and I have wanted to do since our first visit… but we didn’t think the kids could handle the length. It’ll definitely be a must on our next visit. Honestly, most of the early parking spot grabbers at Logan Pass do the entirety of this hike. This point to point hike picks up the Highline Trail at the top of Going-to-the-Sun Road at Logan Pass and meanders down in elevation to The Loop portion of Going-to-the-Sun Road on the west side of the park. After finishing at the Loop, people ride the shuttle back up to their car at Logan Pass. You can find more information on the full hike at this AllTrails link.
You can pick the trail up at Logan Pass. The first section of the trail is on a sheer cliff side, but there’s a cable!Views of Going-to-the-Sun Road down below.My three hikers.Views from atop Haystack Butte.After trail selfie.
Trailhead Location: Grinnell Glacier Trailhead near Swiftcurrent Motor Lodge in Many Glacier
If you’re reading the mileage on this hike and are in disbelief that an eight year old and two five year olds completed it, you’re not the only one! I am still in disbelief that my three kids rocked this hike. This is a very popular trail, and your best bet to see a glacier up close; Dan and I have had it on our bucket list for years. We thought that we were going to be able to shorten the length of the hike with a boat ride, but we did not book early enough for the boat rides. Let’s just say, a lot of things have changed since we took that same boat ride in 2011.
Our kids really wanted to see a glacier up close. And after failing to secure boat ride tickets at an early enough date, we told them we weren’t going to be able to get up to the glacier. But, after they were able to rock the 8.2 miles to Haystack Butte earlier in the week, we thought they might be able to do it. They kept insisting on trying, so we decided to give it a go. We got up early one morning and got to the trailhead by 8:30AM in the Many Glacier part of the park. At the time, we had moved our camper to the eastern part of Glacier to make access easier for those parts of the park.
The beginning of this hike is relatively easy. It winds its way around two lakes in the Many Glacier area, first trailing around Swiftcurrent Lake and then winding its way around Lake Josephine. It is this portion of the overall mileage that you can cut off by taking a boat from the Many Glacier Lodge. This portion of the hike is sometimes closed due to bear activity. The hills around Lake Josephine are overgrown with berry bushes, a favorite of black bears!
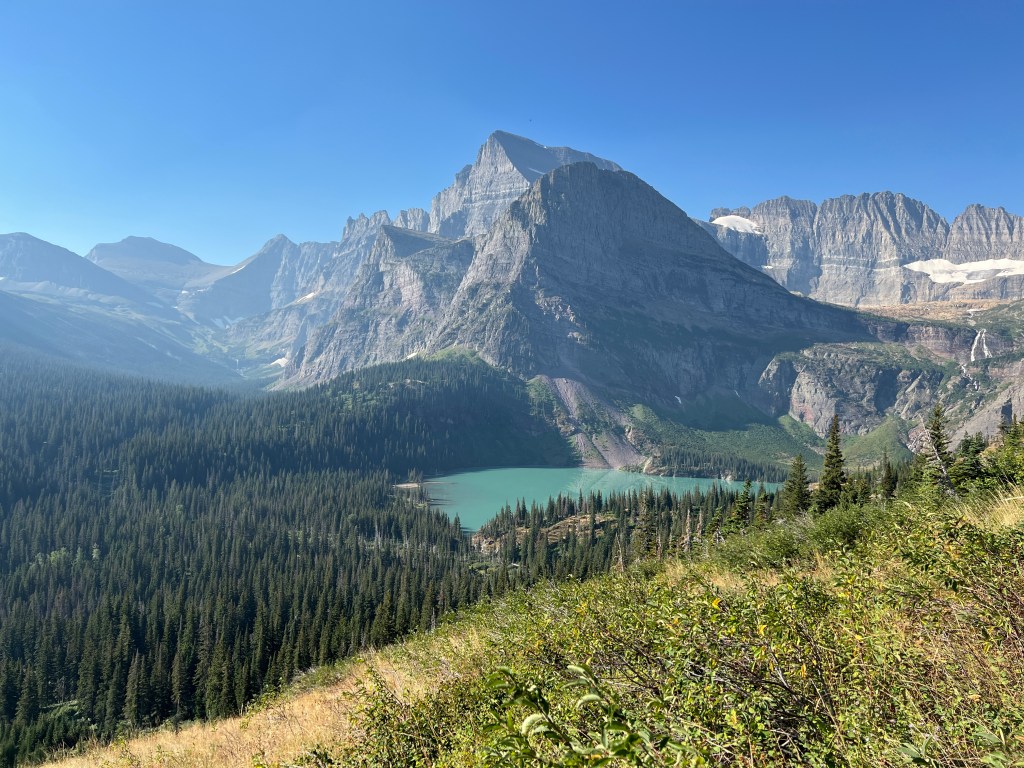
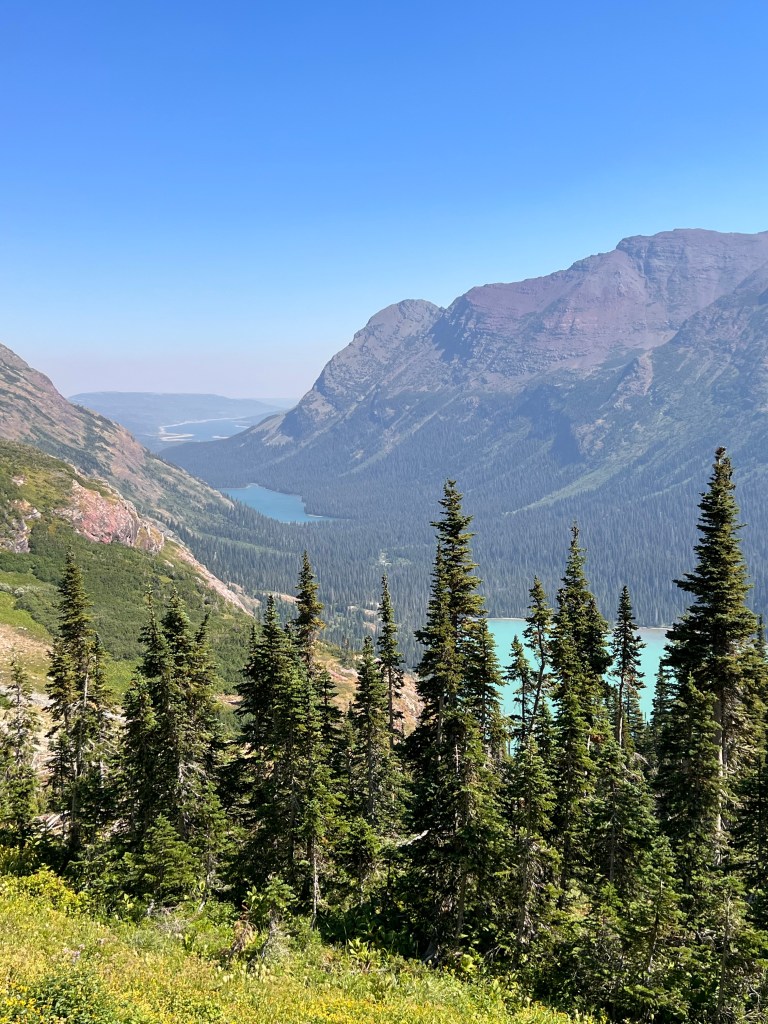
At the end of Lake Josephine is where the elevation climb begins. The elevation gain is no joke. If you travel to Glacier, I would not attempt this hike on the first day of your visit… give yourself some time to adjust to the elevation difference. You start hiking up. The beginning part of the climb you are surrounded by bushes, but the higher you hike, the vegetation clears out and you are given breathtaking views of the mountains. You will see down below the turquoise waters of Grinnell Lake gleaming in the sun. The color is unreal… the lake is fed by the glacier above. You’ll also hike along different colored rock striations, and in some parts you can see the fossilized sea floor from when this area of the continent was covered by a large sea. You’ll also cross over some alpine waterfalls… the number depending on the time of year you are hiking.
After a steady climb, you’ll find yourself close to the glacier. You won’t be able to see Grinnell yet… but it’s just up that hill. About a quarter mile from the trail summit, you can find a pit toilet. Beware, however, these pit toilets were nasty. I recommend packing along some hand sanitizer and maybe some toilet paper! The last quarter mile climb, in my opinion, is the hardest. It is a very steep elevation gain, but the reward is worth it. When you crest over the final hill, the views are amazing.
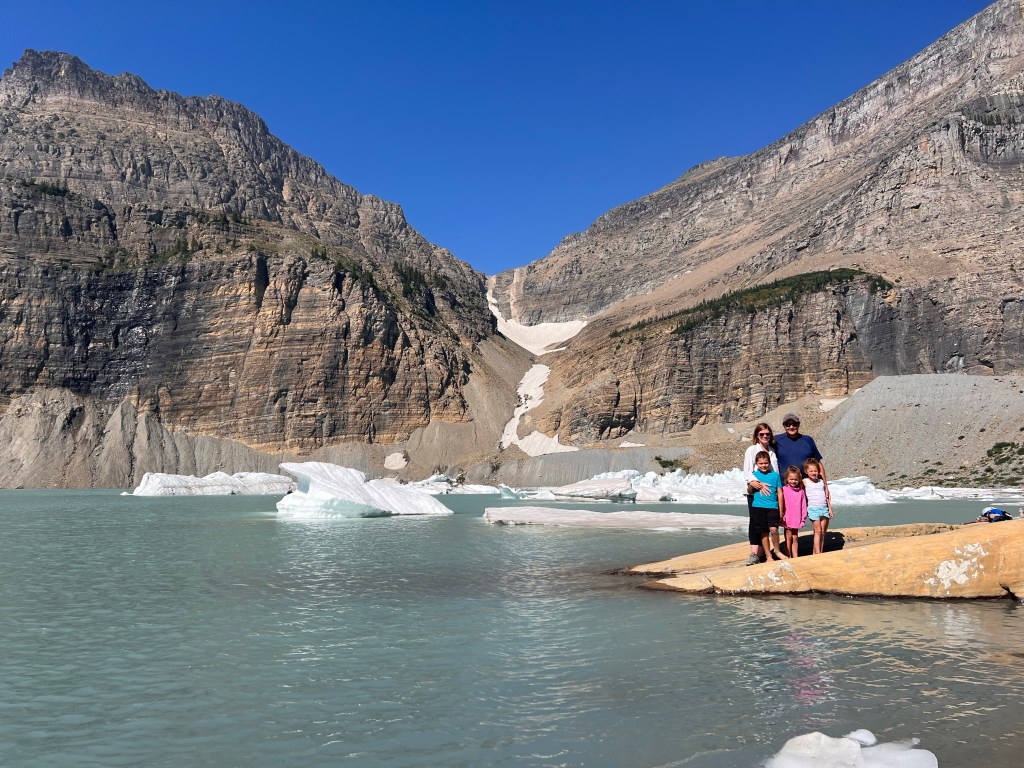
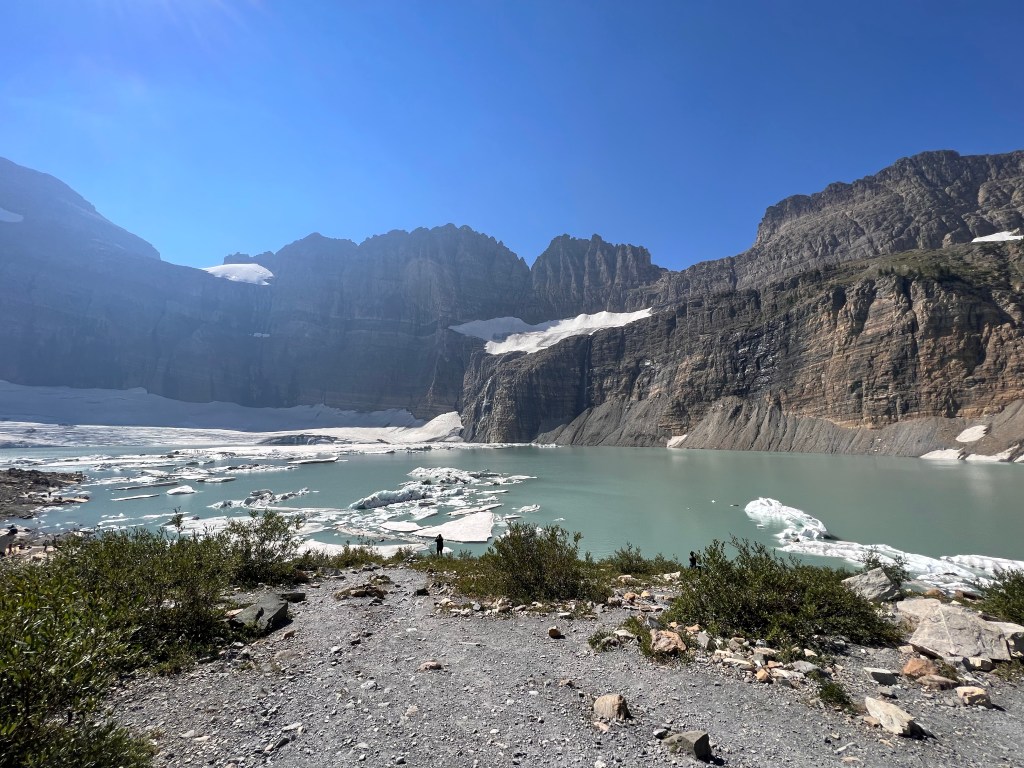
Grinnell Glacier is named after George Bird Grinnell, a conservationist who was instrumental in establishing Glacier as a national park in 1910. The glacier is one of just 25 remaining glaciers in the park. It used to cover 710 acres in the 1800s as one solid glacier, but climate warming has reduced the size of the glacier, so it now sits in two parts: the initial glacier itself and a shelf glacier that used to be attached. A lake now has formed at the base of the glacier, an area that used to be covered by ice. Visitors can no longer walk out on the glacier, for fear of further degradation. However, you can hike right out to the lake edge and see the glacier close by in the distance. The lake is cold, with icebergs floating in it.
We can attest that it is cold as the kids dipped their toes in the water. Be careful though… the rocks can be slippery! Levi actually slipped and fell in up to his neck in the icy water. It was a scary experience in the moment, but we were able to rescue him without drenching ourselves! We stripped him down to his undies, and wrapped him in some additional layers we had. There was a breeze blowing and it was chilly up at the top, but the sun warmed him quickly before we hiked back down. Just a note – take some additional layers on this hike!
We took a lunch and spent about an hour up at the top of the hike, especially knowing we had a long hike back. When you have rested, you go back the way you hiked up. I am not going to lie, by about mile ten, we were all tired. The sun was brutal on the way back down and there was no shade until you reached the lakeshores. By the end of the hike, Addy had a blister, Levi’s big toe was bothering him, Dan’s knees hurt, and my feet were killing me. But, we accomplished the whole thing… and the kids didn’t whine one bit.
I mentioned earlier on that there is a way to shorten this hike, and that is to ride a portion of the trail on a boat. The Glacier Park Boat Company operates several boat shuttles and tours on each of Glacier’s major lakes. You can reserve an early tour through the Glacier Park Boat Company which leaves from Many Glacier Lodge and will cross Swiftcurrent Lake, disembark passengers for a short quarter mile walk over to Lake Josephine, and then will take passengers to the other side of the second lake. This will cut off roughly three miles of the entire hike. If you book a trip, you can disembark at the end of the Lake Josephine, hike up to Grinnell, and then when you come back down, wait at the boat dock for a return trip. The boat company also offers guided hiking tours up to the glacier and/or a return trip only (which will allow you to just cut off the final 1.5 miles of the hike). Here are some things to note about booking a boat tour:
Boat tours need to be booked out early! When Dan and I visited in 2011, we walked up to the dock and booked the next boat. This is not the case anymore! We looked for tours more than a month before our trip, and there were none available.
Return trips can also book out, so reserve those too. I waited until a week prior to just book the return trip, and it was too late. They were completely sold out a week prior to our arrival (and I checked for every day that we were in the park).
If you manage to get a trip booked, make sure it is early in the day. The final boat disembarks from the top of Lake Josephine at 5:30, so if you are not back down the trail by that point, you’ll be walking your way back around the lake!
Swiftcurrent Lake.Lake Josephine.Grinnell Lake off in the distance.My three powering up the last quarter mile before the glacier overlook.Dipping his toes in the glacial melt.So proud of these three!Our family at the base of the glacier.Grinnell glacier in the background, with the melt ice lake in the foreground.Gorgeous mountain views.End of hike selfie.
“To walk in nature is to witness a thousand miracles.”
Marie Davis
We’ve done quite a few hikes in the park over our various visits. We’ve by no means done them all, and there are many that we want to do but haven’t had the opportunity yet. These are five of our favorite hikes to do with our kids, and these are just our opinions. These are great day hike options, not just for kids, but for all ages!
When we brought the kids in 2019, Levi was five years old and the girls were only two and a half. That didn’t slow us down too much. Dan and I carried each of them in our Osprey hiking carriers and Levi powered through on his own. This year, everyone was able to hike on their own AND carry their own water! Woohoo!
Before listing our top hikes, I want to emphasize some important tips. Please consider these tips as you hike into Yellowstone’s backcountry, even if it’s a shorter hike.
Carry Bear Spray: Yellowstone is prime bear country. The greater Yellowstone ecosystem houses the largest population of grizzlies in the lower 48. There are also a great number of black bears. We saw a black bear on one of our hikes in Sprough Creek. While he ran the other way when we encountered him, we still had our hands on our bear spray. When hiking with the kids, Dan and I both carry bear spray on our hip. Don’t keep it in your backpack – you want it easily accessible. We keep the kids between us, with one of us in the front and one of us in the back. Bear spray can be purchased in the park or even at WalMarts and Costcos (cheapest!) if you are close to a town with one of those stores. If you are flying in, either buy it at a park store or you can rent it at one of the bear spray rental counters. Rentals can be found in Jackson Hole, south of Teton, or in Yellowstone at Canyon Village.
Stay on the Trail: Yellowstone is a fragile ecosystem and many parts of the park lay on a thin crust with dangerous thermal features just beneath the surface. For your safety, stay on the designated trails.
Make Noise: When you hike into the backcountry, especially on a less traveled trail, make some noise. Talk, sing… wear a bear bell if that’s your style. Bears most often charge when they are startled. It oftentimes works to just let them know you’re coming.
Pack it Out: The saying you often hear is “a fed bear is a dead bear.” Once a bear gets a taste of human food, they’ll come looking for it. Make sure you pack out all of your trash. This also means to take care of your personal belongings, especially on boardwalks near geothermal features. Hold on to your hats, camera lens caps, and other personal items – especially when it’s windy!
I have lots of other tips and tricks for hiking with kids. From wearing appropriate footwear, to bringing all the snacks, and giving them ownership of the hike… there are things that we’ve found that have worked to encourage our kids to go the extra mile, literally. Kids are capable of extraordinary things and as I tell mine all the time, “you can do anything you put your mind to.” Our kids have impressed the heck out of me with their mileage and elevation gains… this past trip doing some of their longest distances. It means the world to be able to experience some of these new places with the kids. Their wonder and their sense of accomplishment makes every hike worth it.
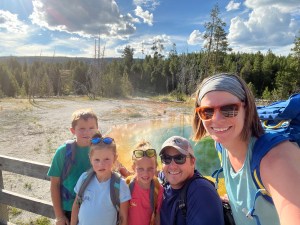
While most people wouldn’t think of the boardwalks as a typical “hike,” the distance you have to walk to get from the Old Faithful parking lot all the way to Morning Glory Pool is a lot for little legs! If you add in all of the stops you can make along the way, and the various connecting boardwalks, you can easily walk well over three miles. As you hike, make sure to stop at some of the best recognized geothermal features and try to catch a geyser eruption or two; we loved seeing Morning Glory Pool, Castle Geyser, Grand Geyser, and Old Faithful!
This will be a heavily trafficked area most of the time, so don’t expect to enjoy solitude. We did find that going in the evening, when most people are heading out of the park to dinner, there were less people on the boardwalks.
Hiking around the Upper Geyser Basin, 2022.Morning Glory Pool, 2022.Morning Glory Pool, 2019.
Trailhead Location: Northeast Entrance Road out to Lamar Valley – access at Yellowstone River Picnic Area (just over the bridge from Tower-Roosevelt)
We hiked Speciman Ridge back in 2019 and wish we had opted to do this hike once again this year. We hiked part of the Sprough Creek trail this past year, and definitely were more in love with Speciman Ridge when we hiked it a few years ago.
This is a very long hike. When we hiked it with the kids, we only did about 2.5 miles before turning around and coming back to the car. This is the best way to experience longer hikes with kids if you don’t think they can handle the entire loop. You can always turn around and come back!
When we started this hike, we had to hike to the top of a ridge and then it leveled out. The remainder of the miles that we did were relatively level, and you skirted the ridge along which the Yellowstone River winds down below. We saw prairie falcons diving off the cliff walls, and marmots scurried along our path, unphased by our presence.
This is a less popular hike, so definitely carry the bear spray. We only saw two other people along the trail the entire time we hiked and we were on high alert for bear activity. Never saw any though! There’s something very special about being able to get away from the populous of Yellowstone and experience parts of the park by yourself. It was a wonderful experience.
Speciman Ridge – Canyon of Yellowstone River.Hiking. Summer 2019.
#3: Brink of the Lower Falls of the Yellowstone River
Trailhead Location: Canyon Village – access the trailhead from the North Rim Drive
The brink of the Lower Falls is definitely worth taking the kids on. There aren’t many places in the US where you can stand right at the brink of a major waterfall. You can literally walk right out to the corner of the overhang and look straight down over the waterfall.
This is a heavily trafficked trail, and in the summer months you can expect a heavy stream of people. The trail, while short, does switchback down into the canyon. This means that you will have to do the switchback climb all the way back up. I was honestly quite surprised with my kiddos, they managed to walk the entire trail up without stopping once. Insert a fist bump emoji here.
Brink of the Lower Falls, 2019.Brink of the Lower Falls, 2022.Water rushing over the edge – view from the brink.
#2: Fairy Falls
Mileage: 4.8 miles out and back (round up to 5 if you do the Grand Prismatic Overlook)
Trailhead Location: Grand Loop Road near Grand Prismatic Spring in the Midway Geyser Basin
We have done the Fairy Falls hike both times that we visited Yellowstone with the kids. Even though the hike is five miles long, the majority of the trail is flat and wide and is perfect for kids. On this hike, you can also veer off slightly and hike up to the Grand Prismatic Overlook before heading back down to the trail. In my opinon, this view of Grand Prismatic is the best in the park.
If you are planning on combining the overlook with your hike, plan on getting on the trail later in the day. We made the mistake of hiking early in the morning to try and beat the crowds back in 2019 and we couldn’t see any of the hot spring due to the intense steam rising from the hot spring.
After stopping at the overlook, continue on to Fairy Falls. When you arrive, you’ll find yourself standing at the base of a 200 foot tall waterfall. It cascades whimsically over the cliff edge, probably giving the waterfall it’s name. After viewing the falls, you can continue on to Imperial Geyser. We’ve never gone the extra steps, but I’ve heard it’s a great hike.
Fairy Falls is a heavily trafficked trail, especially on the portion of the hike that leads to the Grand Prismatic Overlook. It literally can look like a people mover with the amount of people travelling the trail. There is an overflow parking lot for the trailhead, and that even gets full. I’ve driven by during times when the parking lot and overflow parking were completely full and many cars were then parked out on the main road, lining both sides of the road. We went later in the evening, after dinner, and managed to get a spot pretty easily.
Our family at Fairy Falls, 2022.Fairy Falls.View from the Grand Prismatic Overlook.Three kids at Fairy Falls, 2022.
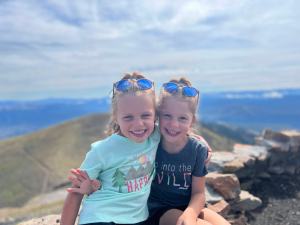
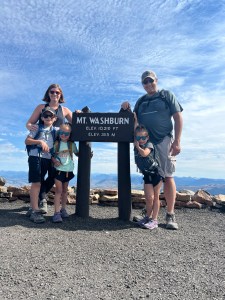
Trailhead Location: Dunraven Pass along the Yellowstone Grand Loop Road, between Canyon Village and Tower
Dan and I first hiked Mt. Washburn on our first trip to Yellowstone back in 2013 (I was pregnant with Levi!). We wanted to carry the girls and complete the hike with Levi back in 2019, but the road was under construction and the trailhead was closed. We knew that this visit, Mt. Washburn was going to be a definite.
Now, we knew that this was going to be a tough hike for little legs. My inexperienced hiker vibes had a tough time with the switchbacks the first time that we did the hike. I remember having to stop multiple times to huff and puff and catch my breath. We psyched the kids up for it. Prior to going on the hike, we took multiple hikes earlier in the week to get their feet and legs conditioned. We hiked 6 miles in Sprough Creek and challenged them to hike Mt. Washburn.
The morning of the hike, all three were determined. And they shocked me. They really did shock me. Not one ounce of complaining, not one negative word as they climbed the nearly 1,400 feet in 3.4 miles.
This can be a busy hike, as many day hikers like to partake. We chose to start early in the day. We were worried on the day of the hike because there was dense fog everywhere we drove. I prayed that it was just settled in the valleys, and we lucked out. By the time we reached the trailhead at Dunraven Pass, we had gotten above the clouds and were able to start our hike with clear views. We arrived at the trailhead around 8:30AM. Make sure you layer, as you can get chilly as you hike up the elevation.
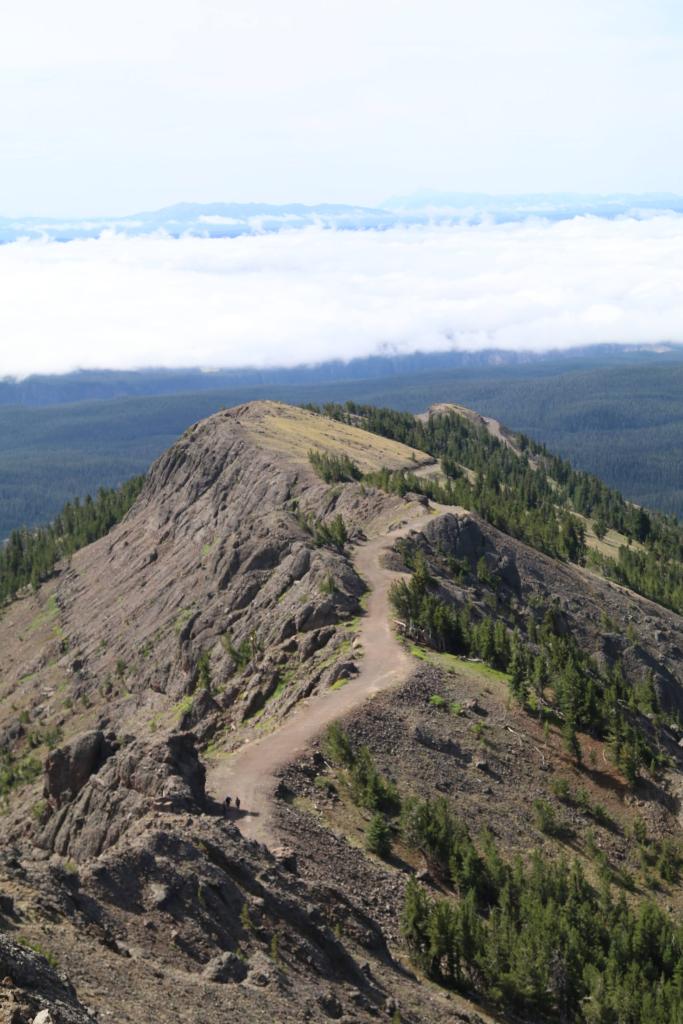
The hike starts out going uphill almost immediately. After an initial climb, it levels out for a bit before starting switchbacks. We encouraged the kids by telling them we would stop at the end of each switchback and it worked wonders. We caught our breath, took a drink, looked at the beautiful views, and kept on going. Eventually you’ll find yourself hiking above the trees. The summit of Mt. Washburn sits at 10,219 feet.
We lucked out by going early in the morning. We were able to spot four bighorn sheep at the top of the mountain. They stood in our view for a few minutes before cresting the mountaintop and heading down lower into the valleys, off the trail, to feed!
At the summit, you will find a fire station, complete with bathrooms! The ranger at the top was in disbelief that our kids hiked all the way up to the top. He said not many kids make the trek. He gave them a Junior Ranger sticker for their hard work! We camped out at the top for a half hour or so before heading back down the mountain. Snacks, snacks, snacks… can’t emphasize the importance of snacks enough when hiking with kids.
Funny story – on our first road trip, when we completed this hike, Dan and I had to ride out a storm in that fire station. A massive thunderstorm blew up and we rushed to the summit. Something about being totally exposed during a thunderstorm is chilling to the bones.
The hike down goes much faster than going up! I believe we only stopped once on the way down, and that was only to take off our long sleeve shirts! Going down in elevation is so much easier than going up!
Levi, 2022.Views from the summit.My littlest hikers.Over 10,000 feet.Watching for bighorns.Daddy and his kids.Bighorn sheep at the top of Washburn.View of the trail from the summit.
“Everybody needs beauty as well as bread, places to play in and pray in, where Nature may heal and cheer and give strength to the body and soul alike.”
-John Muir
When one thinks of Yellowstone, the first thing that crosses the mind is the oddities of the geothermal world… the geysers… the hot springs. But Yellowstone offers so much more. It holds a large abundance of biodiversity, it provides us a rich Native history, and it gives us with other geological wonders to marvel at.
Don’t get me wrong, Yellowstone’s geothermal features are definitely something you do not want to miss. I already wrote a blog post on the amazing sights you can see, and what are our best recommendations for seeing geysers, hot springs, mud pots, and fumaroles. You can find that blog post here.
But Yellowstone’s massive size also harbors some other sights to see, places sometimes overlooked when one first mentions Yellowstone. It is these features that I hope to shed light on in today’s blog post.
Before I go into what other sights you can see, first I want to talk about Yellowstone’s size. The park is massive. Yellowstone encompasses over 2 million acres of land. The park is larger than Delaware and Rhode Island combined. There are miles of backcountry trails where a devoted hiker and backpacker can access parts of the park you can’t see from the road.
There is one major road that runs through the park. The Yellowstone Grand Loop road runs for 142 miles. Couple that with 40 mph speed limits, and you can get a feel for how long it would take to travel the loop, and that is without stopping. The loop road is laid out like a giant figure eight, with one road cutting across the center of the park, connecting Norris Geyser Basin with Canyon Village.
There are five entrances into Yellowstone. Dan and I have gone through all but one of them. The southern entrance connects with Grand Teton National Park, in Wyoming. The western entrance connects to Cody, Wyoming, and between the town and the entrance, lies the Shoshone National Forest. The northeastern entrance is the only one we have not driven through. It winds through Lamar Valley and connects the park with Cooke City, Montana. The northwestern entrance connects Mammoth Hot Springs with the town of Gardiner, Montana. Both the northeast and northwest entrances were closed this summer after monumental flooding in that part of the park during the spring of 2022. The final entrance connects the western part of the park to West Yellowstone, Montana. It is this entrance through which we accessed the park during this visit.
Each of these entrances sit several miles off the grand loop road, with some taking longer to access the loop than others. When we entered from West Yellowstone, we had a 14 mile drive before we hit the Grand Loop Road . Keep this in mind as you think about planning a trip to the park.
There are so many different sights to see when you are inside the park. We’ve listed a few of our favorites. Some are easier to access than others, some require a little hiking, but they are all well worth it if you have the time and energy to see them!
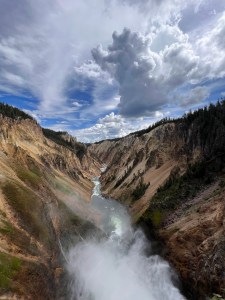
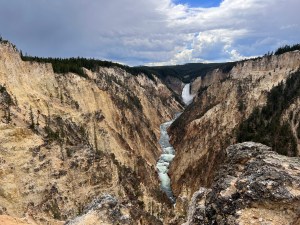
Grand Canyon of the Yellowstone
Imagine a park with a waterfall so grand, a river carving a wide and deep canyon, that it carries the name of another of the most iconic sights in the United States. The Grand Canyon of the Yellowstone is located in the western part of the park, and it is an amazing sight to see.
Grand Canyon of the Yellowstone.
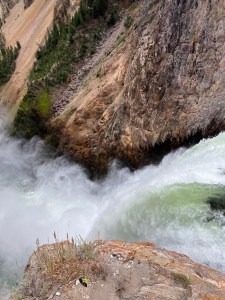
The Grand Canyon of the Yellowstone is carved by the Yellowstone River. There are two large waterfalls cascading down, the Upper Falls and the Lower Falls. The Lower Falls are taller than the Upper Falls, but both are well worth seeing. The river carved a massive canyon, hugged on both sides by yellowed rock, tinted that color from the sulphuric deposits under the Earth. The upper falls cascades down a 109 foot drop, but that is small compared to the 308 foot drop of the lower falls. Parts of the canyon are tinted a reddish hue, essentially rusting from the iron ore within the rock. Coupled together, the canyon and falls create a majestic view only worthy of our first national park.
All of these sights can be accessed starting at Canyon Village. The first drive I would take is the North Rim Drive. This one way road skirts the nothern rim of the canyon. From this drive, one of the best short hikes that you can take is the Brink of the Lower Falls. This short 0.7 mile hike is steep. You walk down a series of switchbacks until you are literally standing right at the brink of the Lower Yellowstone Falls. Get right to the corner of the platform and you can get stunning views of the falls as they cascade over the edge, plunging 308 feet into the canyon. Just remember that you have to hike back up the switchbacks. There are plenty of benches or short walls to stop and rest on your way back up if needed though.
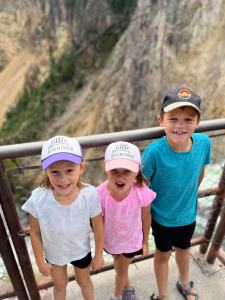
Three kids at the brink of the Lower Falls.Looking over the edge of the Lower Falls.Family Selfie.
After doing the Brink of the Lower Falls hike, continue along the North Rim Drive. There will be turn offs where you can walk down to view the falls. There is also a trail where you can hike along the northern rim of the canyon if you are interested in taking that hike. We opted to just drive the rim and spend our time hiking to some other sights in the park. I would definitely make a stop at Inspiration Point as you will get a nice view of the falls along the northern rim.
After completing the North Rim Drive, I recommend backing around to now drive the South Rim Drive. This drive is a two-way road and has multiple stops along the southern rim of the canyon. One of the first pull offs that I recommend is the Upper Falls Viewpoints. This access point has been redone in recent years and is a pretty awesome stop. The Upper Falls are not as tall as the Lower Falls, but you can still view them at their brink. The water color is beautiful and the viewpoint is very close to the parking lot.
Girls at the brink of the Upper Falls.
The last stop I would make on the South Rim Drive is at Artist Point. In my opinion, this point gives the best view of the Lower Falls and the entire canyon. If you could only stop at one of these picture points, this is my top recommendation. The views of the canyon are breathtaking, especially with the falls in the distance.
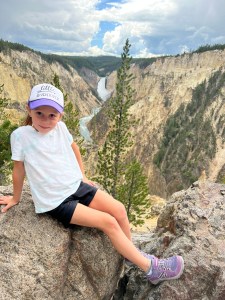
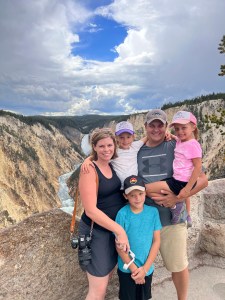
My beautiful girl.Our family at Artist Point.View from Artist Point.
More Waterfalls
Yellowstone is home to many waterfalls. The most spectacular are definitely the falls of the Yellowstone, but there are others that are worth mentioning if you have time to stop at additional viewpoints.
Fairy Falls is a 5-mile round trip hike. The trailhead can be accessed close to the Grand Prismatic Spring geyser basin. If you read my previous post, this is the same trail that you use to access the Grand Prismatic overlook. If you have the time, I definitely recommend you keep on going. While the trail is five miles long, it is an easy hike. The trail is wide and flat for the majority of the hike. At the end of the hike you will see gorgeous Fairy Falls. The falls drop 200 feet and you get to stand at the bottom of it all. While the falls are most impressive in the spring, it is still a worthwhile stop later in the summer.
Our family at Fairy Falls.
Fairy Falls.
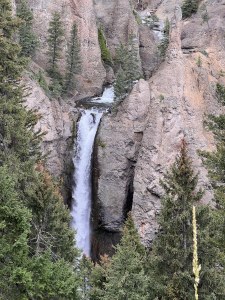
Tower Falls is an easy stop off the Grand Loop road with a very short walking path for an overlook of the falls. You can access it at the parking lot between Canyon Village and Roosevelt. This is only an overlook however, and there is no trail that will take you for a closer look of the falls.
Tower Falls.
Gibbon Falls is another easy stop along the Yellowstone Grand Loop. It is right off the road and can essentially be viewed as a drive by if you’d like. There is a parking lot where you can stop to get a better picture as well. Gibbon Falls is located on the Gibbon River between Madison Junction and Norris Geyser Basin.
Firehole Canyon Drive
The Firehole Canyon Drive is definitely worthy of a drive through. The one-way drive starts close to Madison Junction and winds on a southerly route for about two miles before popping back out on the Grand Loop Road. Dan and I got to take this loop as part of our Yellowstone snowmobiling tour earlier this year. It was so dramatic seeing it in the snow. Even in summer, the drive is absolutely gorgeous, as you wind down through the canyon of the Firehole River. There are some cascading waterfalls on the river as well. This also used to be one of the two places in the park where you could access a swimming hole. It was closed during COVID and has yet to reopen. I have no idea if there are plans to open it in coming years.
Firehole Canyon Drive. Winter 2022.
Glacial Valleys
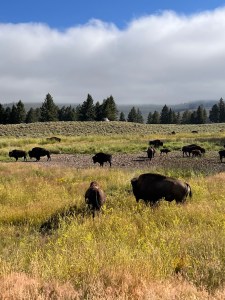
Yellowstone’s massive volcano shaped the land in extensive ways, but it also was shaped by other natural factors. Glaciers used to cover the Yellowstone valley and one of the best places to see evidence of glacial erosion is in Lamar Valley. You can access the road off the Grand Loop Road in Roosevelt. Lamar is an excellent example of glacial erosion because of the massive boulders that were left behind on the valley floor from the receding glaciers. Lamar is most often visited because it is a literal wildlife mecca of the park… a place where you can spot wolves, bison, grizzlies, and pronghorn. If you head that way to take in the biodiversity, take note of the glacial erosion as well! Unfortunately, a large portion of the road taking you through Lamar Valley was wrecked due to the early season flooding in the park and we were unable to truly access the whole valley. They hope to reopen the road by mid-October of 2022! Until then, if you hope to visit, you need to get a day use permit for the road, which will only give you access out to Slough Creek. These you can find on recreation.gov.
Lamar Valley.
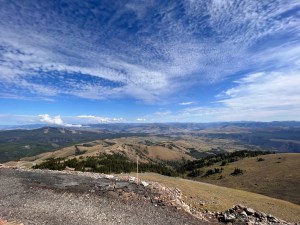
Mountain Peaks
Yellowstone is part of the Rockies. Grand Teton National Park sits directly on its southern border. There are mountains all around the park, with many ridges forming the caldera rim. One of the most beautiful drives you can take to experience stunning mountain views is to drive the portion of the Grand Loop Road between Canyon Village and Tower-Roosevelt. Here, you get sweeping views over Dunraven Pass. Lots of pull offs to get great photos. You can also access trailheads to a few trails, including the trail to the summit of Mt. Washburn.
View from Mt. Washburn trail over Dunraven Pass.
Yellowstone Lake
Yellowstone Lake is another marvel within the park boundaries. The lake is also massive, with 141 miles of shoreline. It is the largest high elevation lake in North America, sitting at over 7,000 feet of elevation. In places, it is more than 400 feet deep. There are many points that you can access the lake. The eastern entrance road skirts the northern part of the lake, and follows it until it intersects with the Grand Loop Road in Fishing Bridge. The Grand Loop road between Fishing Bridge and West Thumb/Grant Village winds along the shores of the lake, with multiple access points and great picnic spots. The West Thumb Geyser Basin skirts the lake’s shoreline, and is an excellent example of how the geothermal features of Yellowstone meld with the natural landscape.
Yellowstone Lake.
Yellowstone’s boundaries hold so many wonders of the natural world, from geysers and hot springs, to canyons, waterfalls, and lakes. Take your time in the park and try to witness as many as you can.
Thank you for following along with us as we give our tips and tricks to traveling the country, especially with kids. Stay tuned for our next blog post – our top 5 favorite hikes to do with kids.
“The Yosemite, the Yellowstone, the Grand Canyon are properties in which every citizen has a vested interest; they belong as much to the man of Massachusetts, of Michigan, of Florida, as they do to the people of California, of Wyoming, and of Arizona.”
-Stephen Mather – First Director of the National Park Service
Dan and I have been incredibly lucky. It’s crazy to think that we East Coast kids have had the opportunity to visit our nation’s first national park four times together. Yellowstone is the epitome of the American national park. It preserves an area of immense proportion for future generations. It holds a plethora of geothermal features that can’t be seen in such a great concentration anywhere else in the world. Because of the decades of preservation, Yellowstone is able to support a treasure trove of biodiversity within it’s park boundaries and the greater Yellowstone ecosystem.
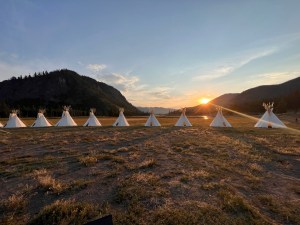
Yellowstone’s sacred grounds were used by a number of Native American tribes for thousands of years before the land became federal property. Twenty-seven tribes have ties to the area, including multiple Sioux tribes, the Nez Perce, the Shoshone, the Arapaho, the Crow, and the Blackfeet. Their history with the park is enough to cover an entire blog post on it’s own. During the last weekend of our stay, Yellowstone began preparations to hold tribal celebrations throughout the park. While we weren’t able to time our visit with presentations by the local tribes, we were able to see some of the preparatory setups, including teepee installations in parts of the park. One of the installations was set up near Madison, where 13 replica teepees stood tall in a valley flanked by mountains on either side. We were able to view the installation at sunset, and it was absolutely stunning.
Native American installation in Madison.
Yellowstone is our nation’s and world’s first national park, and this year it is celebrating its 150th anniversary. The park was established in 1972 by President Grant, before the National Park Service even existed. This establishment of the nation’s first national park even predates the eventual state boundaries that are mapped throughout the park. As it stands today, Yellowstone lays in parts of Wyoming, Montana, and Idaho. Teddy Roosevelt visited the park in 1903, and his famous quote of “for the benefit and enjoyment of the people” sits atop the Roosevelt Arch at the northern entrance to the park in Gardiner, MT. For the last 150 years, Yellowstone has stood as the paradigm of conservation in the United States, leading the way until the National Park Service was established in 1913, through today.
Yellowstone has so much to offer, and there are so many areas to explore, that it is nearly impossible to contain it all in one blog post. I’ve decided to break down my personal travel guide into a series of blog posts. I don’t know how many there will be in the end, but hope that our travel musings may help someone else as they plan a visit to our nation’s first national park.
Yellowstone is a GIANT Volcano
Yellowstone holds the world’s highest density of geothermal features, and for good reason. The entirety of Yellowstone is a gigantic volcano. During a past visit, when Dan and I got the chance to walk some of the boardwalks with a tour guide, we overheard someone ask “so where is the volcano?” The answer was easy… we were literally standing on it.
The Yellowstone volcano has had three major eruptions in the past 2.1 million years, with the most recent caldera-forming eruption occurring 631,000 years ago. The caldera is incredibly immense, spanning 45 miles wide in some areas. Yellowstone has had more recent eruptions, with lava flows helping to shape the land we see today, but the most recent was about 70,000 years ago. If you are interested in learning more about the volcanic history of Yellowstone, I highly recommend the visitor centers at Old Faithful and Canyon Village. They have beautiful interactive simulations, videos, and graphic representations.
The fact that Yellowstone is a giant volcano is the reason why you can find the density of geothermal features in this part of the US. Once you visit, it quickly becomes easy to see (and smell) just how volatile the landscape really is.
When visiting the national park with kids, we talked a lot about how Yellowstone sits atop a giant volcano, but the easiest way for kids to learn about these features is to see them. Yellowstone holds within its boundaries multiple examples of four types of geothermal features (geo meaning Earth; therm meaning heat). Even my five year old twins were able to quickly learn the names of these four types of features, and could identify them as we walked around the multiple boardwalks in the park.
It can be overwhelming when you first look at a map of Yellowstone when you start see the multiple geyser basins highlighted on the map. There is the Old Faithful Geyser Basin, the Biscuit Basin, the Norris Geyser Basin, West Thumb Geyser Basin… and this is just naming a few. All of them take you to different geothermal features and have miles of boardwalks to traverse.
Which geyser basins are the best to visit? Which hot springs are the best to see? How about geysers? We’ve broken down some of our favorite views below.
My biggest piece of advice is, if you have the opportunity, break up the visitation of these features. On our first trip to Yellowstone in 2013, Dan and I packed all of these multitudes of geothermal features into one day. We lost appreciation for so many of these spectacular sights, so much so that I even cut out visiting Norris Geyser Basin when we brought the kids for the first time in 2019. We visited with them during this trip, and I am so thankful that we did.
So, here are our family’s recommendations for the four types of geothermal features found in Yellowstone:
Geysers
Hot Springs
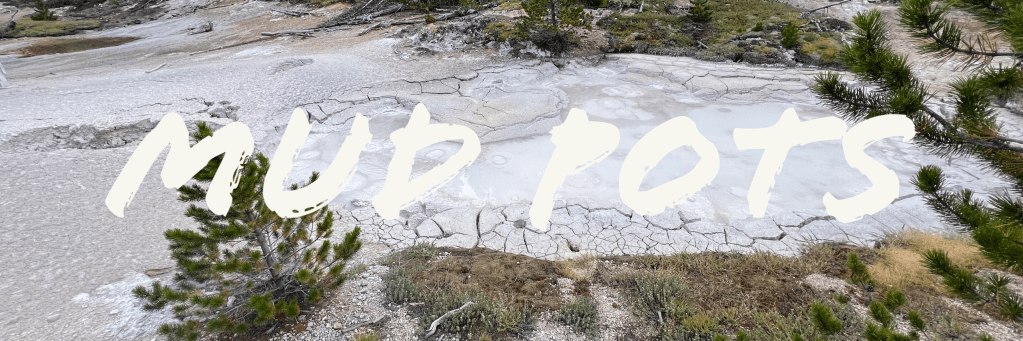
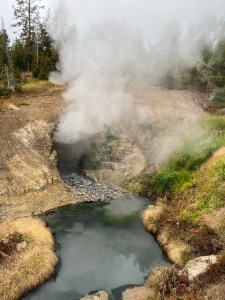
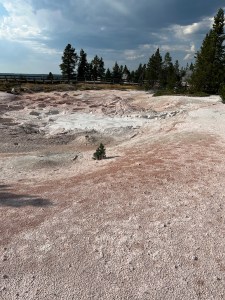
Mud Pots
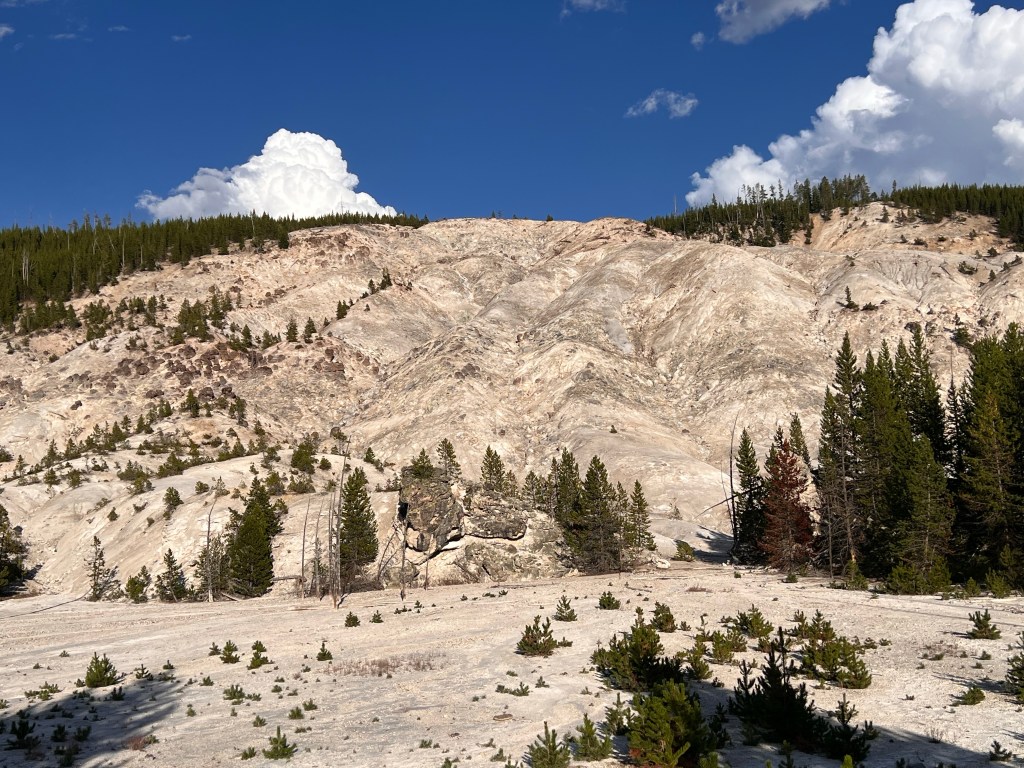
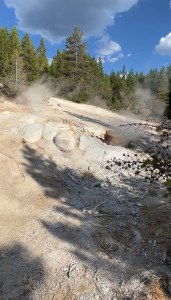
Fumaroles
Before listing off our recommendations for viewing geothermal features, I want to stress the importance of staying on the boardwalks and not straying onto the fragile crust areas that are beyond the boardwalks. These geothermal features are hot, acidic, and each year, result in the injury and sometimes death of people.
Dogs should also remain outside of the park. If you must bring them in because you are driving through the park, consider leashing them to your seatbelts. Remember, dogs are not permitted on any Yellowstone boardwalks or trails.
Geysers are probably the most identifiable geothermal feature found in Yellowstone. Everyone has heard of Old Faithful, and that is the first place most people flock to upon entering the park.
Geysers are one of the four types of geothermal features that can be found in Yellowstone. They occur when a hot spring has a constriction in its plumbing, allowing pressure to build, which eventually causes an eruption. These eruptions should be viewed from a safe distance. Some are predictable, while others are incredibly unpredictable. There are more than 500 geysers in Yellowstone. Here are our opinions of “must-visits.”
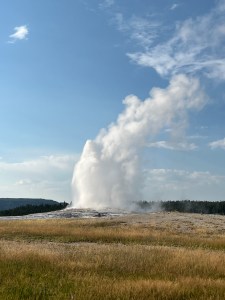
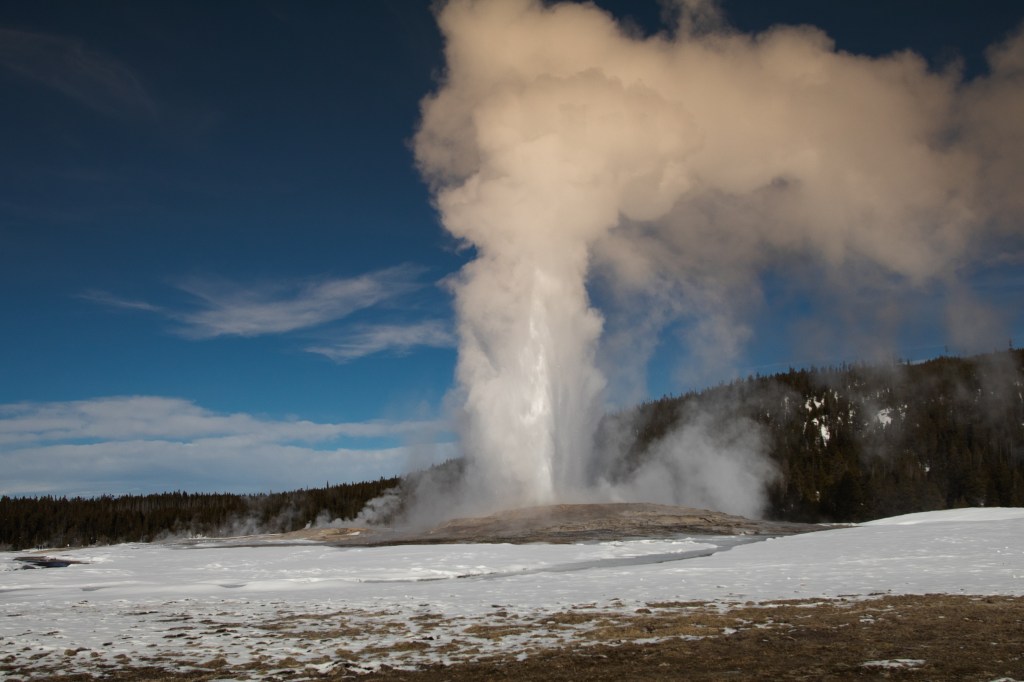
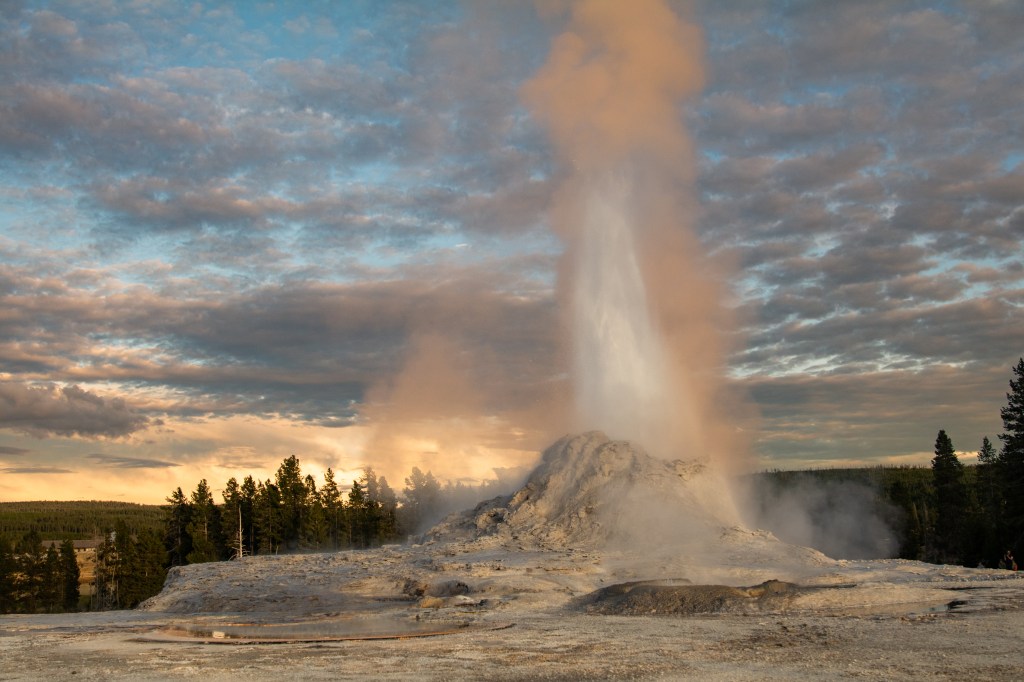
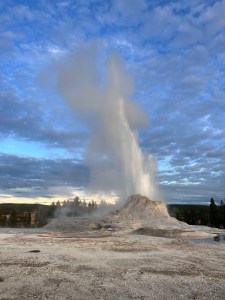
Old Faithful
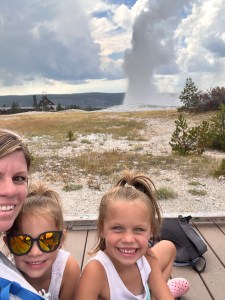
There’s a reason that everyone has heard of Old Faithful and it is the first place people visit. Old Faithful is a predictable geyser, and has been for hundreds of years. It also has a relatively short time between eruptions. Because of this predictability, it can be viewed like the latest feature film, knowing approximately when you can arrive and see it erupt. When a geyser isn’t erupting, it is much less interesting, with just steam coming out of a hole in the ground.
Waiting on a geyser…
Visitors can log onto the Yellowstone NPS page and see when approximate eruptions will occur for the predictable glaciers. Old Faithful erupts approximately every 74 minutes, give or take 10 minutes. Sometimes it erupts before that 74 minute time and sometimes after. Remember, those eruption times are predictions that park rangers do with a stopwatch. Arrive early and wait. One of the eruptions I observed with the girls this visit was 15 minutes past the predicted time. It was worth the wait though. It was the tallest, most powerful eruption I observed while in the park. Overall, Old Faithful erupts on average 20 times daily.
The girls and me, with Old Faithful erupting in the background.
Some interesting Old Faithful facts:
Old Faithful eruptions can reach 90 to 120 feet in the air.
Durations can last anywhere from 1.5 minutes to 4.5 minutes, depending on the strength of the eruption.
Depending on the duration of the eruption, scientists estimate that Old Faithful displaces between 3,700 and 8,400 gallons of water during an eruption.
That water is hot! Water temperature at the vent during an eruption is around 205 degrees, whereas the steam can reach temperatures of up to 350 degrees!
Old Faithful. Summer 2022.
All in all, definitely take the kids to visit Old Faithful. Old Faithful is located in the Upper Geyser Basin. There is a gigantic parking lot, and in the area you can also find a visitor center, a lodge, multiple restaurants and park stores, as well as a gas station. Because Old Faithful is “the” geyser to see, expect to view the natural phenomenon with a few hundred of your closest friends. Find a bench and be respective of others!
If you want to view Old Faithful from a higher vantage point, you can do so by climbing to the Old Faithful Observation Point. It is 0.5 miles up switchbacks, but you can get a different view of the geyser. It can be accessed from the Upper Geyser Basin loop trail. We honestly haven’t hiked this one… not because it was too difficult of a hike, but because we always were able to get great views of the geyser from ground level.
Old Faithful in snow. Winter 2022.
Castle Geyser or Grand Geyser
If you can time it right, you can possibly be in the area to catch an eruption of another geyser in the Upper Geyser Basin. The National Park Service is able to provide predictions on five other geysers, with times posted in both the visitor centers and online at the NPS website. After you’ve watched Old Faithful erupt, you can walk around the geyser ring around Old Faithful to access the Upper Geyser Loop. The Upper Geyser Loop is roughly 3.5 miles, but it can be more or less depending on which geysers you walk to and which boardwalks you take. Both Castle and Grand Geyser are found along these boardwalks.
The boardwalk hike is relatively flat with not a lot of elevation gain. You pass a variety of geothermal features, from geysers, to hot springs and bacterial mats. When you pass any of the predictable geysers, there are benches to use as viewpoints, as well as signage which states the estimated time of eruption, with possible time ranges.
Castle Geyser, erupting at sunset.
Grand Geyser eruptions are taller than Old Faithful’s! It erupts in bursts that shoot 150 to 200 feet in the air, making it the largest predictable geyser in the world. Eruptions occur every 7 to 15 hours, and predictions are usually made with a 90 minute +/- window. Eruptions can last 9-12 minutes. We, unfortunately, did not get to see Grand Geyser erupt up close. We were within the window, but opted not to wait for the eruption. It was our mistake, because the eruption started about a half hour after we left. Luckily, we were still on the boardwalk and could watch the eruption from afar. We thought about running to catch the tail end, but opted instead to wait for Castle Geyser to erupt. We decided we weren’t going to miss a second one!
Grand Geyser’s cone… we left about 20 minutes too early.
Castle Geyser is also found in the Upper Geyser Basin. The cone of the geyser is what makes it incredibly interesting, as it resembles a castle! Eruptions can reach heights of 75 feet and can last for up to 20 minutes. After missing Grand Geyser, we decided to plop down and wait for Castle to erupt. Prediction times are complete with a +/- 60 minute window. We arrived back to Castle around 7:15 PM, with a predicted eruption time of 7:20. Well, Castle didn’t erupt that evening until 8:15PM, almost 60 minutes later. But, it was spectacular. Dinner was late and the kids were starting to get antsy, but in the end, nothing replaces the memories of seeing Mother Nature in action.
A lot of time spent waiting for a geyser to erupt!
All in all, waiting for geysers can be time consuming… but it can also be awe inspiring. If you are in the park and are spending adequate time to view everything the park has to offer, I definitely recommend catching a second (or third) geyser eruption. In all honesty, this was the first time we have ever waited for an additional geyser to erupt, but in the end, it was well worth it.
Castle Geyser when it finally erupted!
Honorable Mentions: Steamboat Geyser and Porkchop Geyser
Both Steamboat Geyser and Porkchop geyser are located in Norris Geyser Basin. They are both on here for different reasons, and if you have the opportunity to walk the boardwalks at Norris, there is a different story to both of the geysers. Both Steamboat and Porkchop are on the Back Basin trail at Norris Geyser Basin.
For how predictable Old Faithful is, you can name Steamboat geyser Mr. Unpredictable. The geyser has periods of sporadic eruptions, and it is highly unlikely that you’ll find yourself in the right place at the right time when the geyser does erupt. The geyser was actually dormant during the early 1900’s, but began a period of activity in the 1960s. In 2018, the geyser began a period of frequent eruptions, with 155 eruptions occurring between March 2018 to now. The most recent eruption (at the time of this blog) was on June 20, 2022.
A very parched landscape.
Unfortunately, we didn’t see Steamboat erupt. But it is worth it to even see the cone of the world’s tallest active geyser. When Steamboat erupts, it can reach heights of over 300 feet and displaces an estimated 70,000 gallons of water! Major eruptions can even cause nearby Cistern Spring to drain completely of water!
Porkchop geyser is also located in Norris geyser basin. I put it in this blog because my kids thought the story behind it was incredibly cool. The geyser was once a hot spring that occasionally erupted. In 1985, the spout started erupting continuously as a geyser. It erupted for four years straight, until it literally blew it’s top in 1989. In September of that year, porkchop literally exploded. Can you imagine being someone who was there to witness that? What you see today is the remnants of the explosion, where parts of the vent are strewn about all over the ground. Today, Porkchop is just a rolling hot spring, but definitely has a cool backstory and is evidence of the immense pressure that can build up in these geysers!
Hot springs are everywhere in Yellowstone, and while some of them can look incredibly inviting, like cool Caribbean waters, the vast majority are extremely acidic, hot, and dangerous! As with geysers, stay on the boardwalks, and don’t step off trail onto the fragile crust.
Hot springs are formed when hot water below the surface has the ability to float freely to the surface. They can be brilliant colors; attributed to either minerals within the pool, heat-loving bacteria, or refractions from the sun. The colors found in each hot spring are what makes each one unique.
Levi and I started reading up on the different types of microbes in the water that can affect the colors of the hot spring. These microbes, known as thermophiles, are heat-loving organisms that thrive at different temperatures in the water. Some of these are bacteria, that thrive in extremely high heat. Some of the pools even have types of algae growing in the hot water. We learned through the kids’ junior ranger program that the hottest thermophiles are in the blue color range, followed by yellow, red, brown, and green is the coolest.
You can observe these thermophiles not only in the pools themselves, but also in the bacterial mats that surround many of the pools and geysers. These bacterial mats are excellent examples of how different bacteria thrive in different temperatures. They create a unique landscape in Yellowstone. These mats are extremely fragile, so it is important to leave them undisturbed. Watch your clothing items as well. I can’t tell you how many different times we saw hats or camera lens covers or other items that had blown or fallen into the bacterial mats.
Grand Prismatic Spring
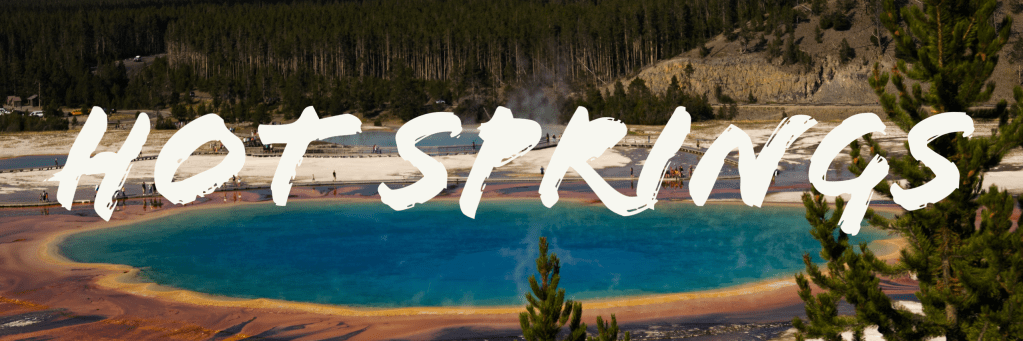
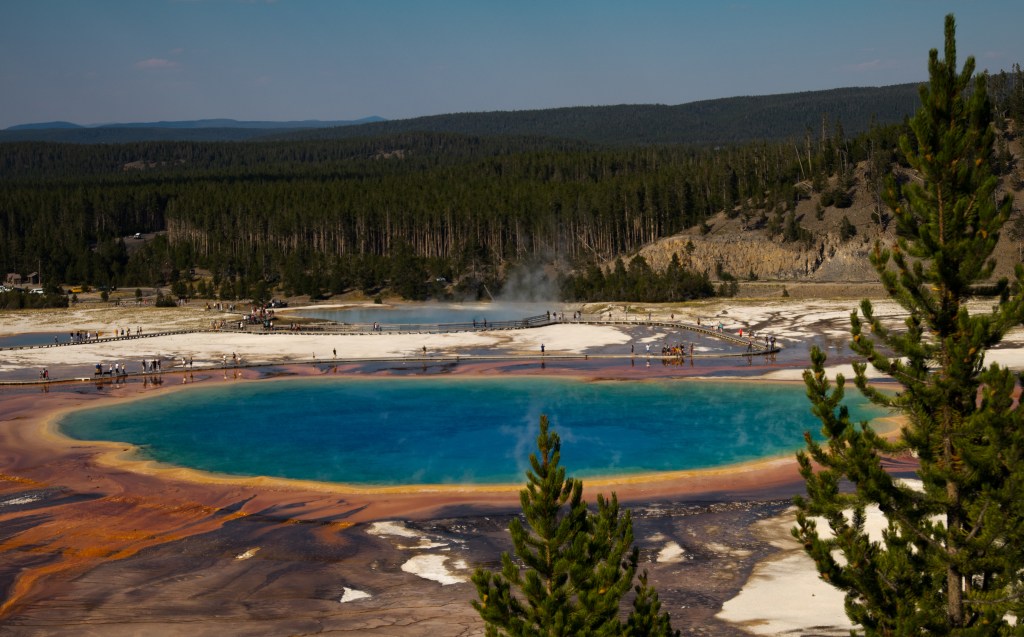
Grand Prismatic literally the pièce de résistance when it comes to Yellowstone, and for good reason. It is huge, and absolutely gorgeous. It is as large as a football field and is nearly 370 feet in diameter. The thermophiles in the water give the spring its brilliant color variations. Bright blue in the middle, with orange, yellow, and green rings around the edges of the spring.
Grand Prismatic is located in the Midway Geyser Basin. There is a boardwalk for visitors to walk on to view the spring close up. But in all honesty, you really cannot fathom the true beauty until you are able to view it from further above. Luckily, there is a way to do just that! Just beyond the parking lot to the geyser basin, there is another parking lot (with an additional overflow parking lot) for the Fairy Falls hike. If you begin this hike, the first portion of the hike will lead you to a Grand Prismatic overlook, which gives phenomenal views of the spring.
Grand Prismatic Spring. Summer 2022.
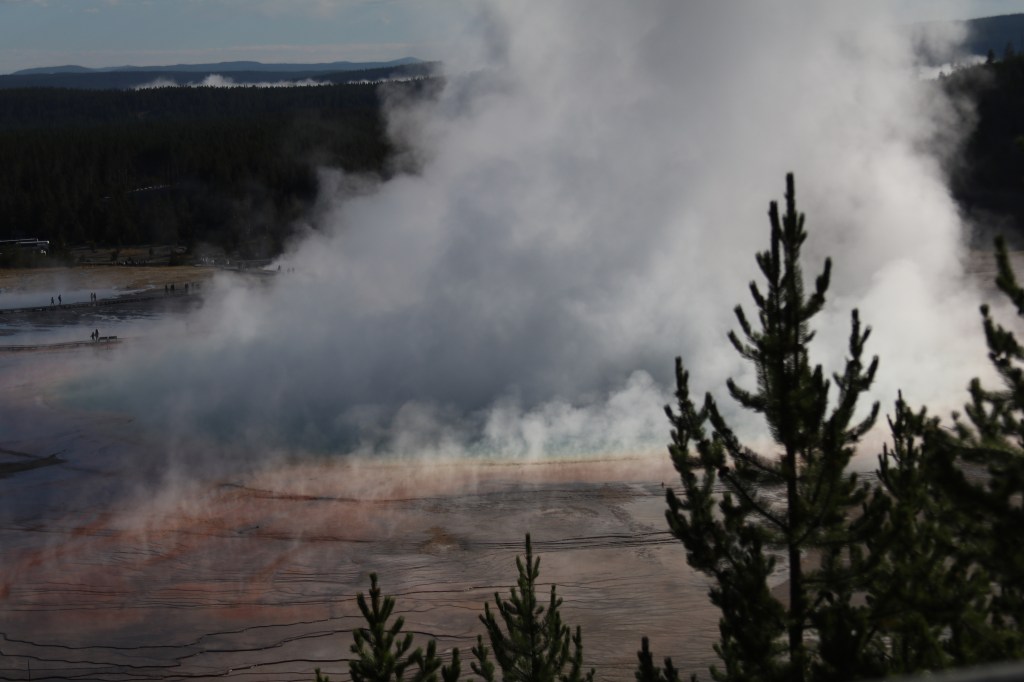
Both the Midway Geyser Basin boardwalks and the Fairy Falls/Grand Prismatic overlook trail are extremely popular destinations to park goers. There will be crowds, especially in the middle of the day. To see just this, I would not recommend arriving early, as I typically would to beat the crowds for a hike. Cooler overnight temperatures cause a large amount of steam in the early mornings, and it is hard to see the true beauty of Grand Prismatic. We made this mistake when we visited back in 2019. We could barely see the spring when arriving at the overlook around 8:00AM. There was a little better view on our walk back after hiking to Fairy Falls. During this visit, we actually went on the hike later in the evening, and it was the best. We arrived at the trailhead around 6:00PM, and while there were still crowds, it wasn’t nearly as busy as the middle of the day and you could see the entire spring very clearly.
Grand Prismatic in the early morning. Summer 2019.
Mammoth Hot Springs
The hot springs at Mammoth are completely different than the hot springs in other areas of the park. You can access them right in town, and walk the boardwalks up to the springs. What makes the hot springs in Mammoth different from other parts of the park is the presence of different minerals in the water. Created over thousands of years, calcium carbonate in the water cools as it leaves the hot spring and has created beautiful travertine terraces.
The kids at Mammoth.
There are two terrace boardwalks located in Mammoth, the upper and the lower. There are over 50 hot springs in the area. While some of them are more majestic than the others, I won’t single any one out because the entire hot spring area is awe-inspiring. You can walk just a portion of the boardwalks, or traverse the entirety of the 3.5 miles.
Honorable Mention: Morning Glory Pool
Morning Glory Pool is located in the Upper Geyser Basin and can be accessed from the Upper Geyser Basin boardwalks around Old Faithful. You can also access Morning Glory from a trail in Biscuit Basin. Either way, Morning Glory is a worthwhile stop. It is sadly a perfect example of what can happen if we do not take care of these geological wonders.
Our hike to Morning Glory.
Morning Glory was once much more lustrous. It was named in the 1880s due to its similarity to the beautiful flower. Over the years, vandalism caused the bright blue pool to lose much of its original color. Visitors threw trash, coins, rocks, and logs into the pool. These items clogged the vent, which lowered water circulation and caused the temperature of the water to drop. While vandalism has decreased, especially after the park service relocated the park road making it harder to access the pool, the damage has been done. Unfortunately, vandalism does still occur and the vent still gets pumped on a yearly basis.
Morning Glory is worth the walk still! It is a beautiful yellow color which fades to green.
Morning Glory Pool.
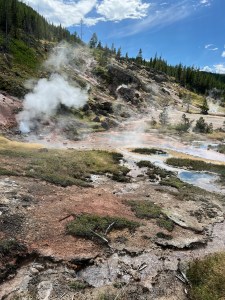
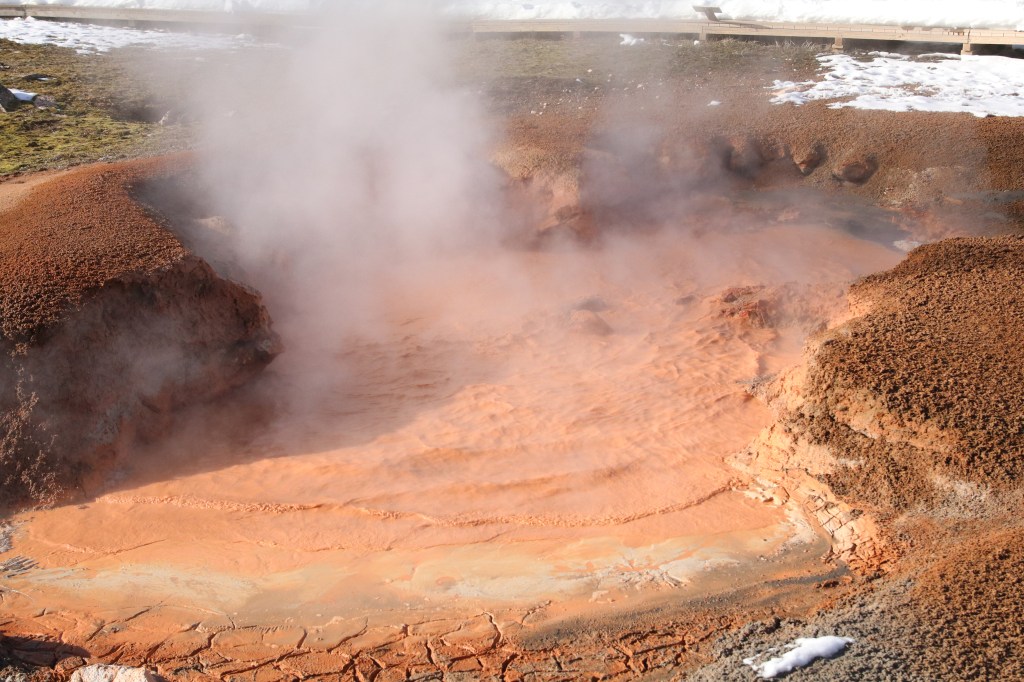
Mud pots are my kids’ absolute favorite type of geothermal feature. It’s probably because of the noises they make as gasses bubble to the surface. Mud pots are the third type of geothermal feature that can be found in Yellowstone. The most interesting part is that they can look different each time you see them. Mud pots are affected by the rain and snow fall and the temperatures outside.
Mud pots are formed when acidic water from under the Earth dissolves rock into mud and clay. Gas bubbles up from below the surface, giving the pots a particularly potent rotten egg smell. Mud pots can also change throughout the year, based on the precipitation, as stated before. Throughout the year, mud pots can have lots of water and be more of a hot spring, they can get drier and bubble like a mud pot, and if they completely dry up in years without a lot of precipitation, they can act like a fumarole.
Here are some of our favorite mud pots to explore in Yellowstone.
Artist Paint Pots
Artist Paint Pots are located in the Lower Geyser Basin near Norris. They have their own parking lot. After walking a short trail that is a 1-mile loop. You will come to a geothermal area packed with hot springs, bacterial mats, fumaroles, and you guessed it… mud pots. The area is named for its pastel multicolored mud pots, and the surrounding soil which is multiple shades of orange and red. The geothermal features in the area are surrounded by red mud, which gets its coloration from the sulphuric deposits in the soil.
Different colored soils from sulphuric deposits.
Look at the excitement on the kids’ faces!
The best mud pots are located at the top of the steps in the loop. As the mud dries in these pools and gets thicker, the gas bubbles push harder to get through, causing mud droplets to fling several feet in the area. Add to that the glooping sound that is made when the mud flies, and the kids will be laughing (and joking that someone smells like a rotten egg).
Artist Paint Pots.
When we observed the paint pots this past trip, we had rain earlier in the day. As a result, we were able to see the mud pots in two different stages. There was one pot which had a drier texture and thicker mud flinging into the air. Next to that pot, another one had much looser mud, which looked almost as if it was boiling. Artist Paint Pots is definitely worthy of a stop on your Yellowstone geothermal tour.
Mud Volcano
The Mud Volcano in Yellowstone is actually located in an opposite part of the park from the majority of the geyser basins. You can find it just off the Yellowstone Loop Road south of Hayden Valley. There is a short boardwalk trail of just under a mile that you can walk around there, but the mud volcano portion is visible from the parking lot.
The mud volcano was first observed in the 1870’s and shortly after being first discovered and documented, it exploded and coated nearby trees in mud when it came to the surface. It used to have a muddy dome over it, but the explosion left behind a very large crater of bubbling mud. There are multiple hot springs in the area, all filled with boiling mud. They’ve been aptly named cauldrons.
One of the smaller pools at Mud Volcano.
While not a mud pot, another worthwhile stop if you are in the mud volcano area is the Dragon’s Mouth Spring along the same trail. Here, boiling water rolls out of a cave-like opening. Steam billows out of the opening, and water is lapped along the outer shores as the gas bubbles emerge. All the while, strange noises can be heard coming from the mouth of the cave, giving name to it’s namesake of Dragon’s Mouth. Definitely worth a look at this interesting feature in the park!
Dragon’s mouth spring.
Honorable Mention: Fountain Paint Pots
Fountain Paint Pots are another good place to observe some mud pots in action. They are located in the Midway Geyser Basin near Grand Prismatic. There is a short boardwalk which takes you past all four types of geothermal features: some geysers, hot springs, mud pots, and fumaroles! The boardwalk is only a little more than a half of a mile and an easy stop!
These mud pots are very similar to the ones described in the paragraphs above. The reason they’re worth visiting is because no two mud pots are the same. Some of the mud pots on the trail I’ve seen at some points nearly devoid of moisture, and spitting out great amounts of mud. This most recent visit, however, we saw one mud pot filled with water that was boiling. It was a much different experience than the other times I have visited!
Fountain Paint Pots.
Fountain Paint Pots. Winter 2022.
Fumaroles, also known as steam vents, are the final type of geothermal feature that can be found in Yellowstone. While, in our opinion, not nearly as fun to look at as the other types of geothermal features, they still deserve to be highlighted!
Fumaroles are essentially geysers with so little water in them that they never erupt. The little water that is in the vents turns to steam before reaching the surface, sometimes producing a hissing noise by the time it reaches the surface. Interestingly enough, these are the hottest geothermal features in the park, as the steam is hotter than water temperatures in other types.
Roaring Mountain
Roaring Mountain is the best place to observe fumaroles in action. Located off the park road, just a few miles north of Norris Geyser Basin, there is a parking lot for you to observe the steam vents from afar. In the late 1800s and early 1900s, the number, size, and power of the vents was much greater than it is today. At the time, it was said that the hissing sound coming from the vents was so loud that the noises could be heard up to five miles away.
While not as spectacular as it once was, we were able to stop and still see a few vents producing steam. You can view them from a safe distance, most likely without even having to get out of your car!
Roaring Mountain.
Honorable Mention: Puff and Stuff Geyser
Stuff and Puff geyser is located in Norris Geyser Basin, so you can hit it on the same time as visiting Steamboat Geyser and Porkchop Geyser. You can access it on the Back Basin trail at Norris Geyser Basin. While technically not a steam vent because it is still an active geyser, it is highly unpredictable as to when eruptions will occur. The reason I listed it here is because of the connection between geysers and fumaroles. When geysers are building pressure, they are essentially just steam vents producing lots of steam! And Stuff and Puff turned out to be a favorite of our kids because it produced the hissing noise typical of powerful steam vents. We stood and listened to it for some time.
Stuff and Puff Geyser.
In Conclusion
I know this was a long blog post, but I hope it was able to provide someone with valuable information when visiting Yellowstone. The important thing to remember with kids is that everything you do is a learning experience. Sometimes, the best learning experiences are those that are hands on and in front of them.
By the end of our trip, even my five year old twins could identify each of the geothermal features as we passed them. They could tell me their favorite memories and which geysers and hot springs they liked the most. My eight year old knows the meaning of thermophiles… we even talked about the roots in the word and what the word parts mean. He could identify different temperatures of the hot springs just by looking at the colors of the bacteria living at different temperatures.
Most importantly, have fun with it! But be safe at the same time. Yellowstone is a place unlike any other in the world. And it’s here… in our United States. If you haven’t had a chance to visit it yet… book the trip! Do it! See the United States! And follow along with us, as we give tips and tricks to touring the United States with our kids.
What will the next blog post be in our Yellowstone series be? Stay tuned!